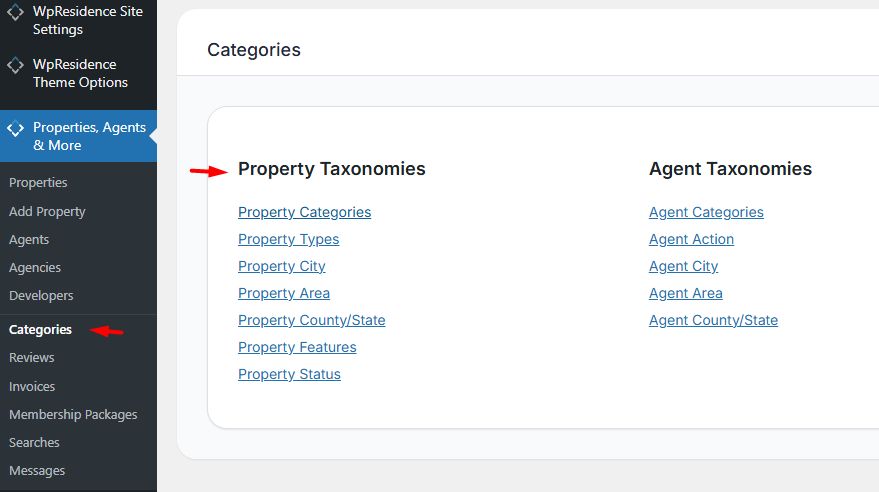
What are Property Taxonomies in WPResidence?
In WPResidence, taxonomies are the built-in property classification systems used to organize listings.
They power category pages (also called taxonomy pages), filters, and many search dropdowns.
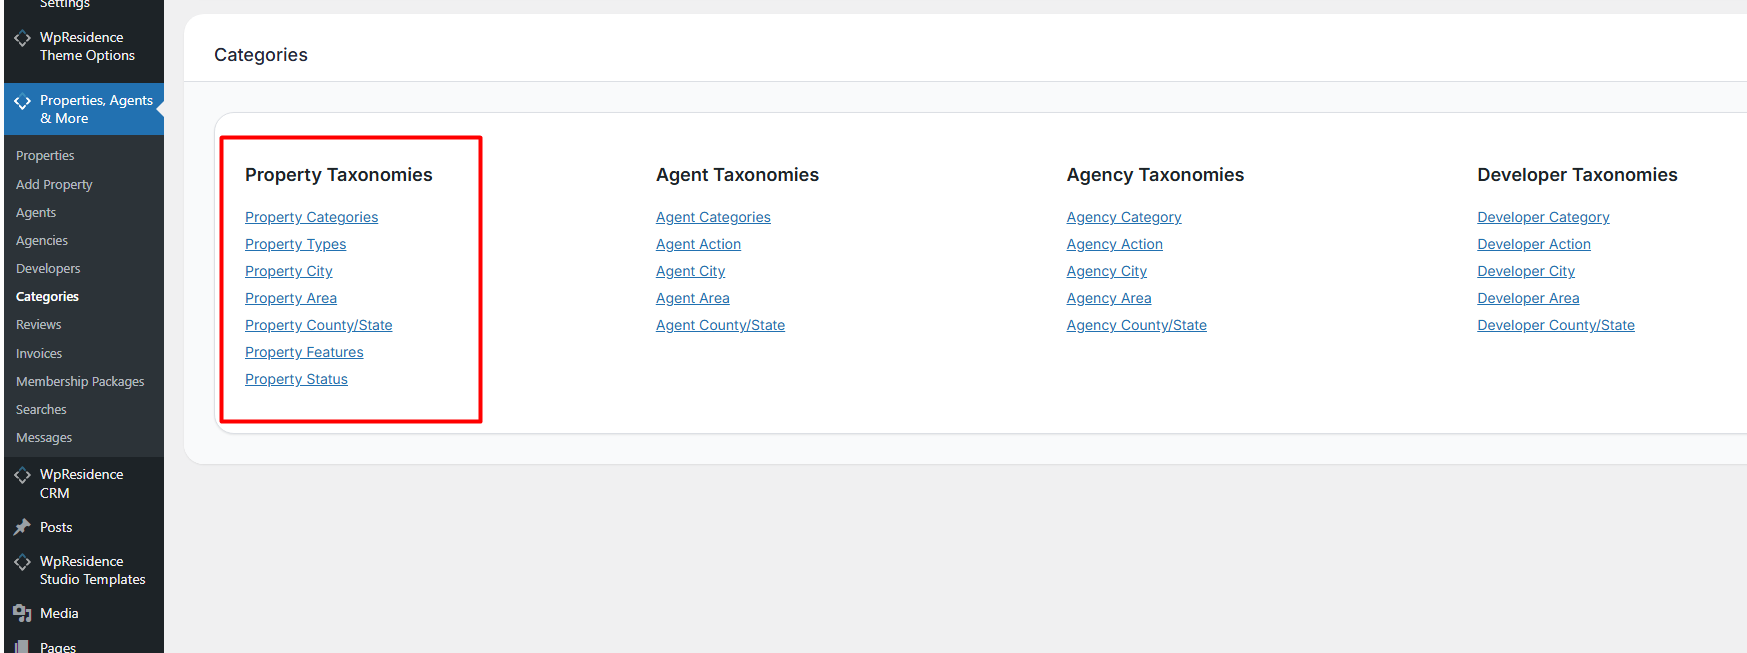
WPResidence includes these main property taxonomies:
- Property Category
- Property Type
- Property City
- Property Area / Neighborhood
- Property State
- Property Status
- Property Features and Amenities
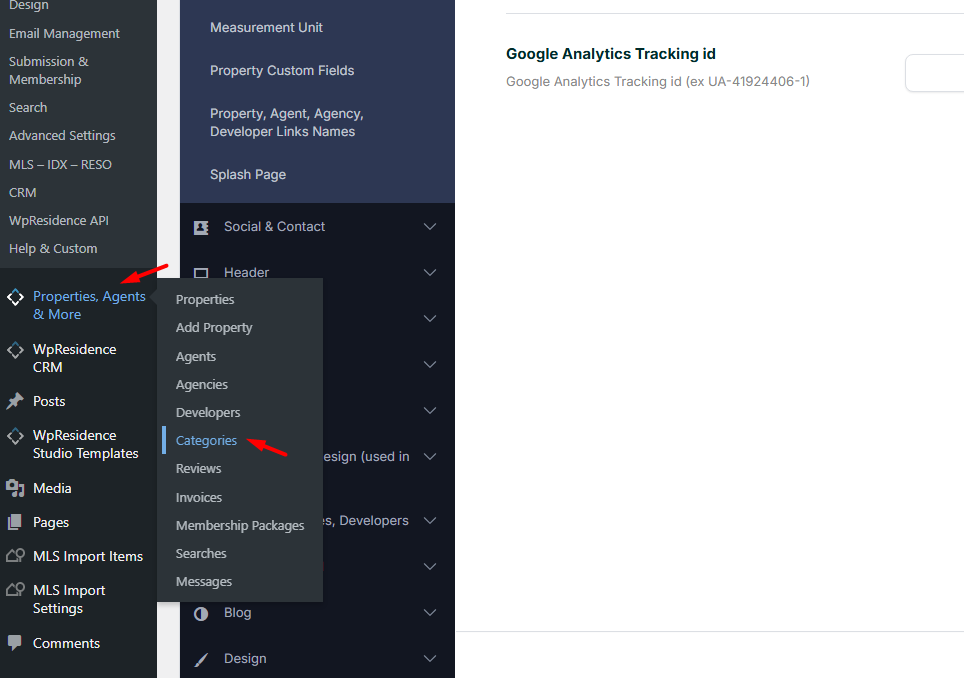
You can manage them from:
Admin Dashboard → Properties, Agents & More → Categories
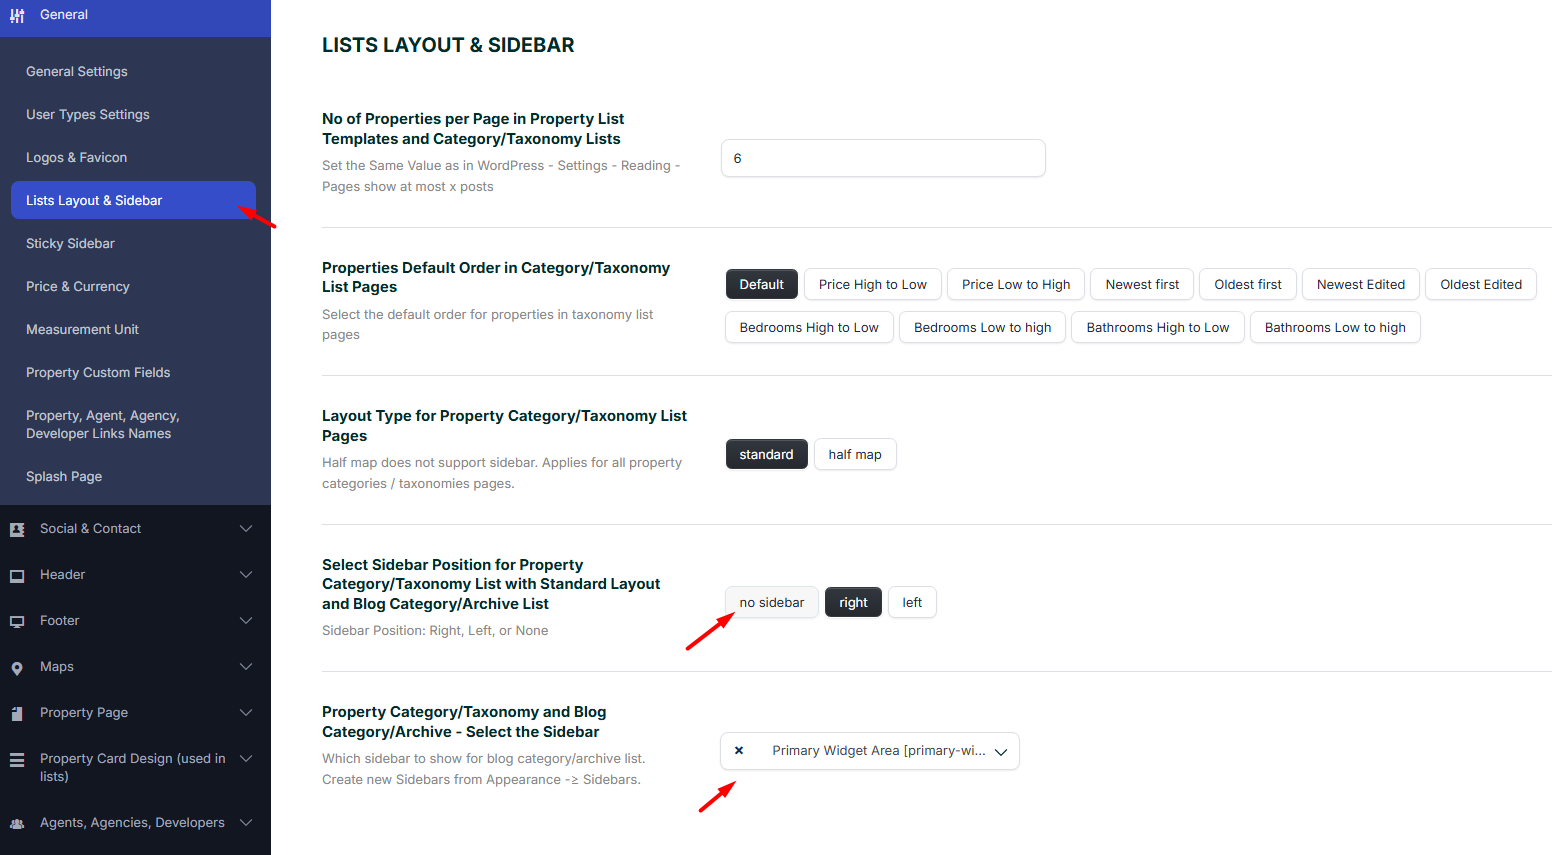
Set the number of properties per page on taxonomy pages
To control how many properties are shown on category and taxonomy pages, you must set the value in two places.
This is because WPResidence relies on WordPress pagination, and WordPress expects a consistent “posts per page” value.
Step 1 (WPResidence setting)
Go to Theme Options → General → Lists Layout & Sidebar and set the number of properties per page.
This value applies to list-based pages such as:
- Standard lists
- Half Map lists
- Category and taxonomy lists

Step 2 (WordPress setting)
Go to WordPress Dashboard → Settings → Reading and set the same number for:
Blog pages show at most.
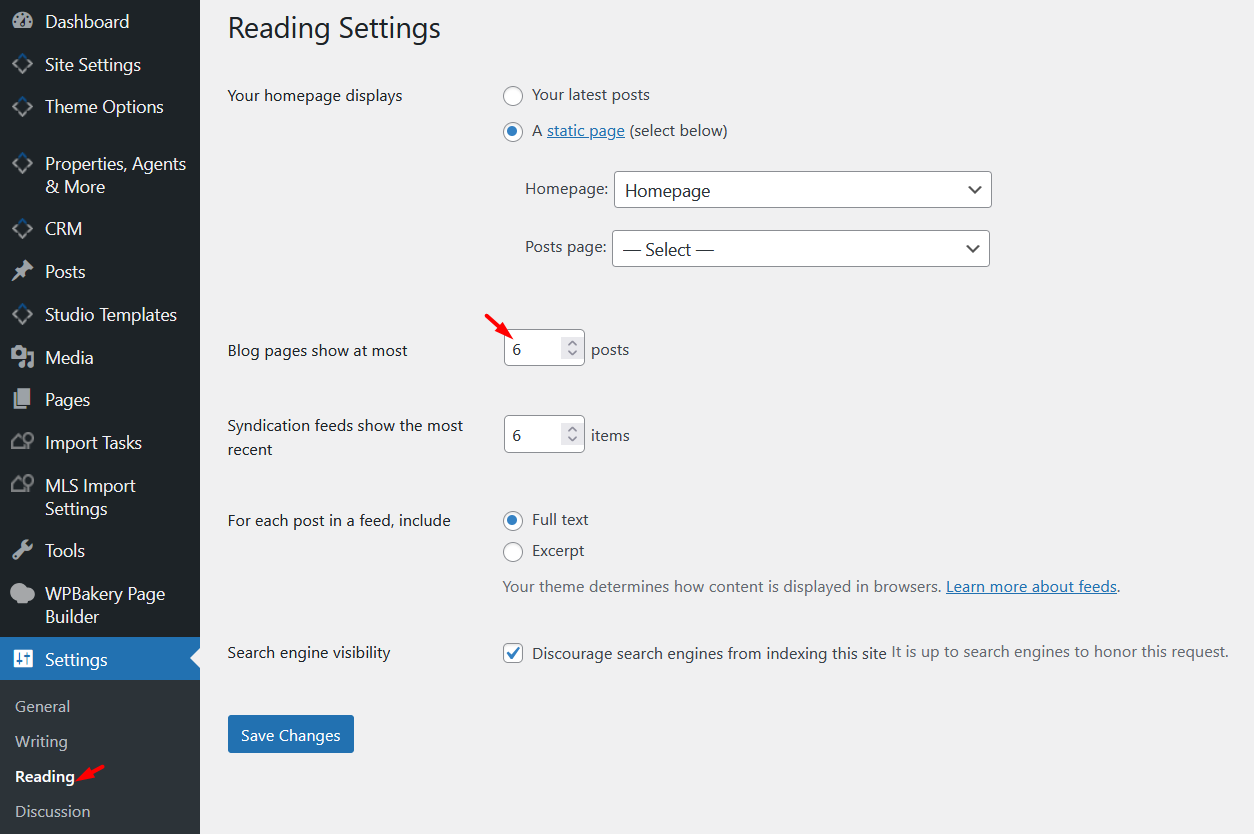
Important: These two values must match. If the numbers are different, pagination can behave incorrectly (missing results, duplicated pages, or broken navigation).
Add, edit, and delete categories (taxonomies)
Categories (and other taxonomies like City, Type, Status) are created and edited from the taxonomy management screens.
The process is similar across all property taxonomies.
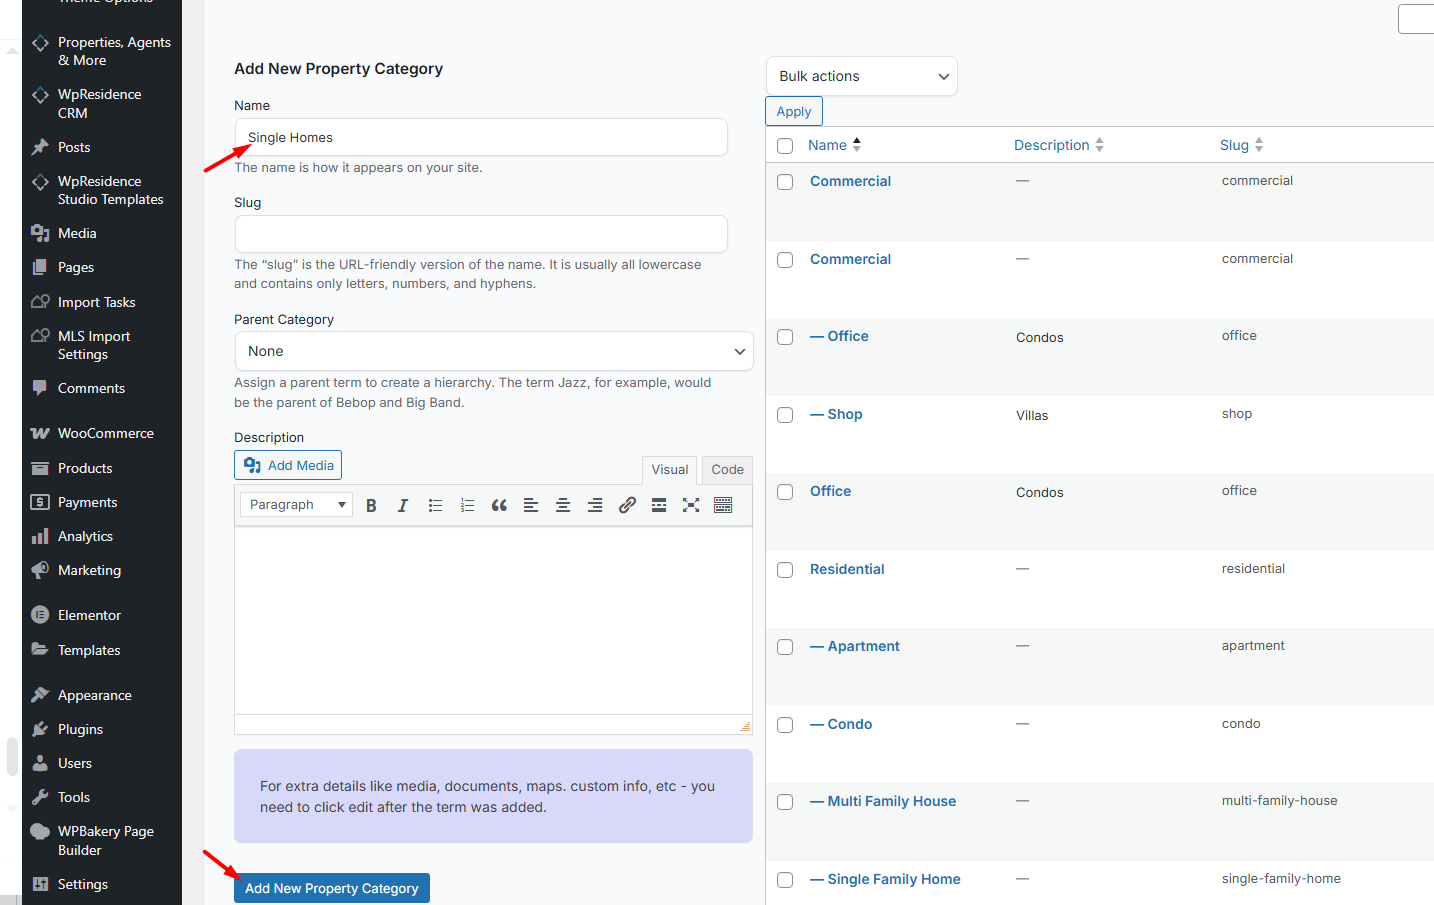
How to add a category (taxonomy term)
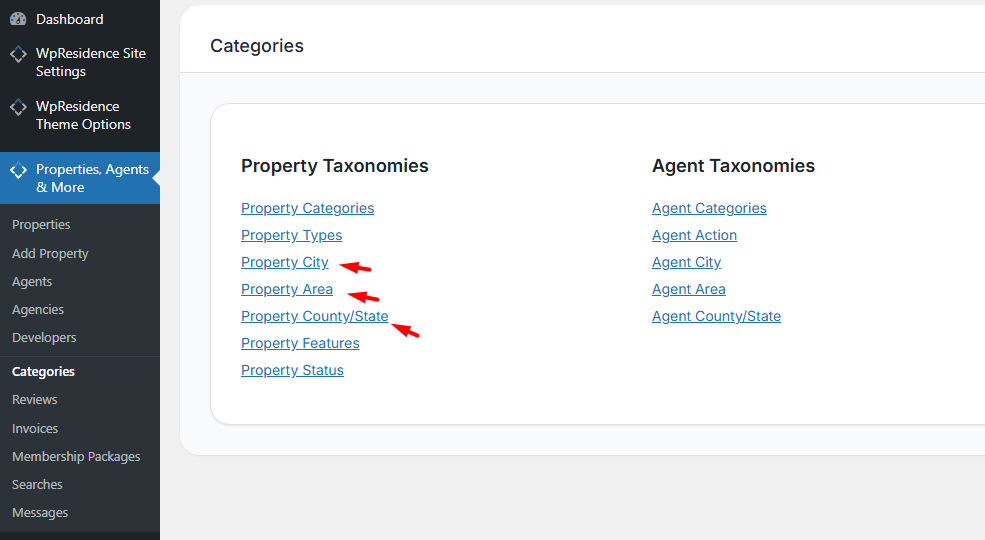
- Go to Properties, Agents & More → Categories.
- Select the taxonomy type you want to manage (Category, Type, City, Area, etc.).
- Enter a Title.
- Leave Slug empty so WordPress generates it automatically.
- Click the Add button (example: “Add New Property Category”).
Note about slugs: Titles and slugs should remain consistent, especially if you use translated versions or import data.
Avoid changing slugs after you already have properties assigned, unless you fully understand the SEO and URL impact.
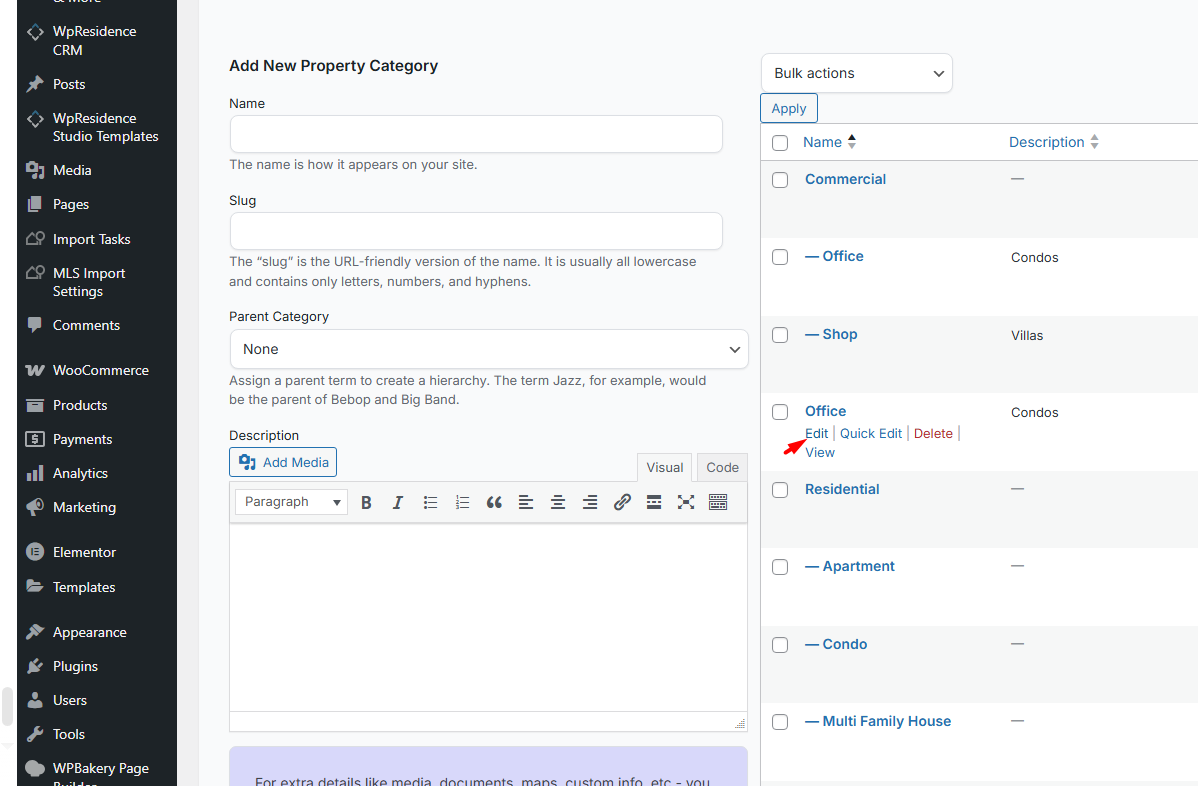
How to edit a category
To edit a category, click the category name (or the “Edit” link) from the taxonomy list.
Update the title or settings and click Update.
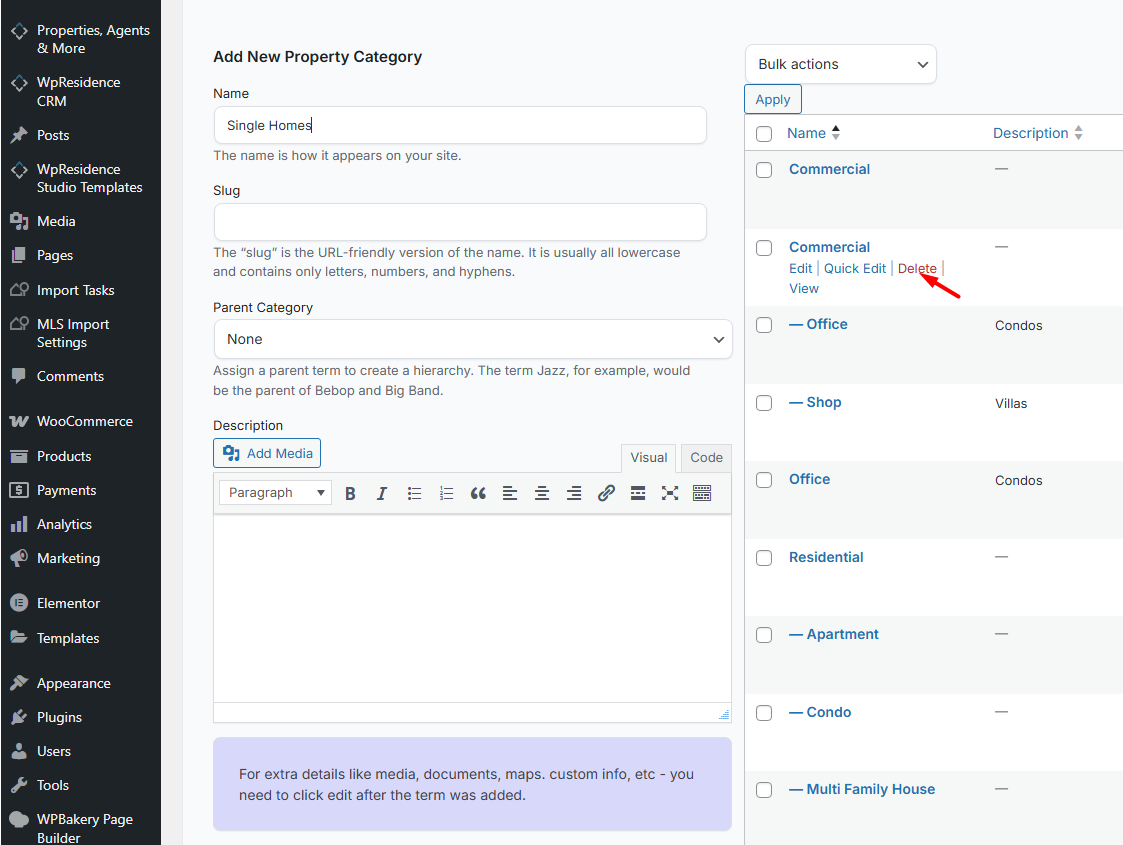
How to delete a category
To delete a category, click Delete next to the taxonomy item you want to remove.
Create child categories and understand how they behave
Child categories let you build a hierarchy (parent and subcategories). This helps visitors browse and filter more naturally.
Create a child category
- Create a new category.
- Select a Parent Category before saving.

Assign or change a parent category later
You can also edit an existing category and set its parent from the edit screen.
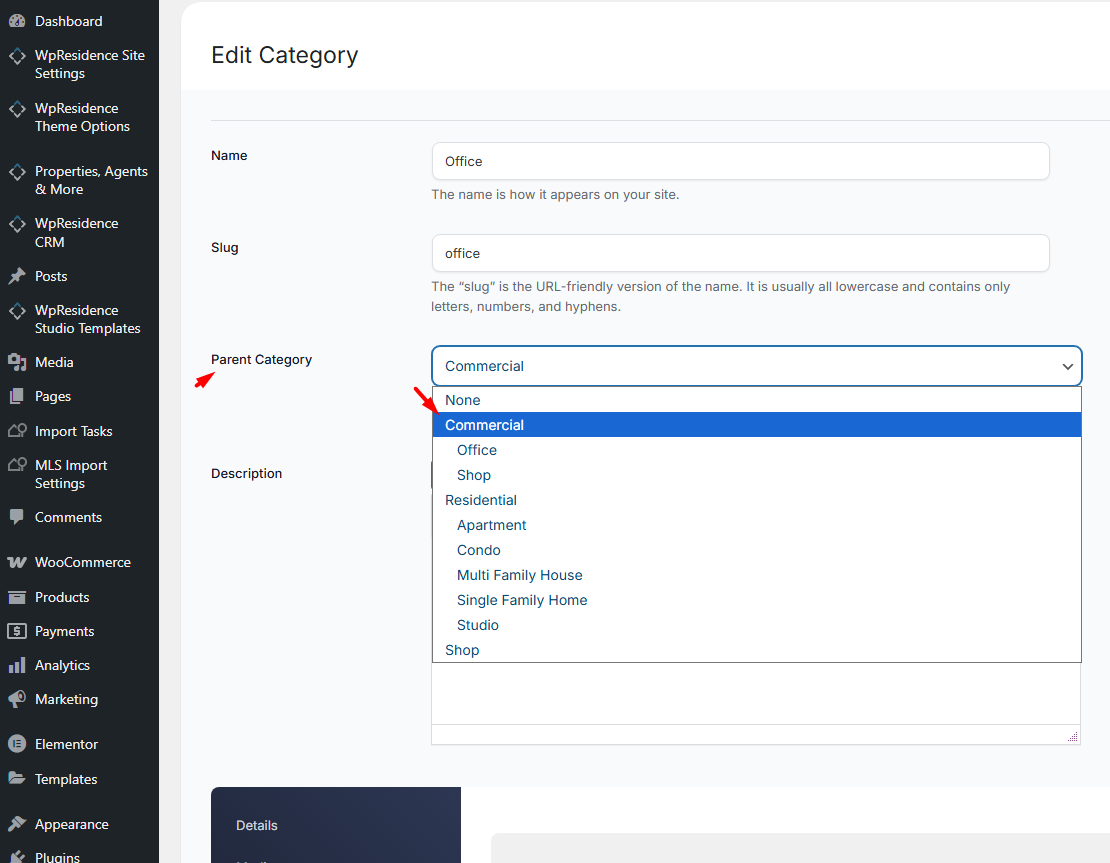
Important behavior:
- Assign properties to the most specific (child) category. The property can still be discovered through the parent category in many browsing and filtering situations.
- In map-based views (Half Map or Search Over Map), you may sometimes notice map and list behaving differently if a property is linked to multiple terms.
If you see “no results found” on the map while results appear in the list, check whether properties are assigned to multiple categories and whether the search logic is set to match “like” vs “equal” in custom fields setup.
View a taxonomy page
When you create a new taxonomy item (category, city, type, etc.), WordPress automatically generates an archive page for it.
That page becomes the taxonomy page visitors can browse.
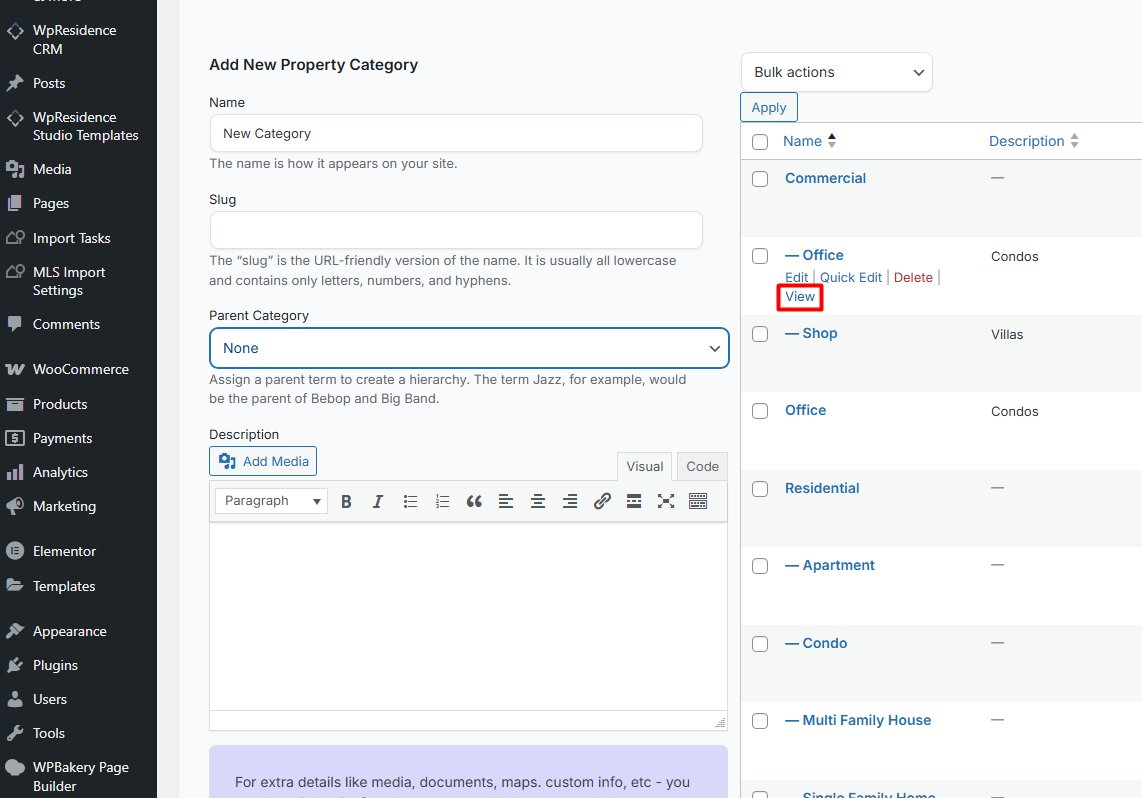
To open it:
- Go to Properties → Categories (or the relevant taxonomy panel).
- Click View next to the taxonomy term you want to preview.
Add a taxonomy link to your menu
You can add category, city, type, and other taxonomy pages directly to your WordPress menu.
- Go to WordPress Dashboard → Appearance → Menus.
- On the left, locate the taxonomy panel (Property Category, Property Type, etc.).
- If you do not see taxonomy panels, enable them using Screen Options (top-right of the Menus screen).
- Select the taxonomy items you want and click Add to Menu.
- Drag and drop menu items to rearrange them.
- Click Save Menu.
For more details:
How to manage menus
Choose taxonomy page layout: Standard or Half Map
WPResidence taxonomy pages can be displayed using Standard layout or Half Map layout.
This controls the structure of the page visitors see when browsing a category or city archive.
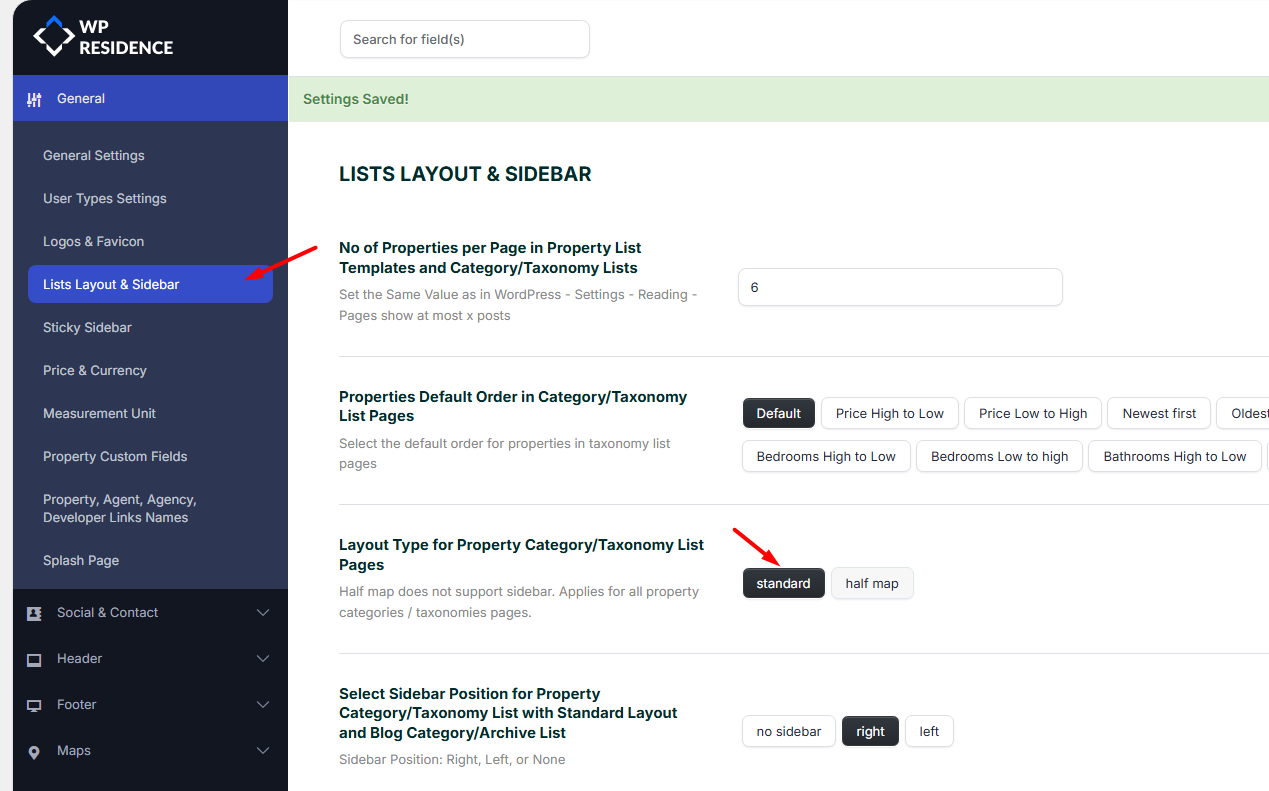
Standard layout
Standard layout displays a regular grid/list and supports hero media and sidebars.
To set it:
- Go to Theme Options → General → Lists Layout & Sidebar.
- Find Layout Type for Property Category/Taxonomy List Pages.
- Select Standard.
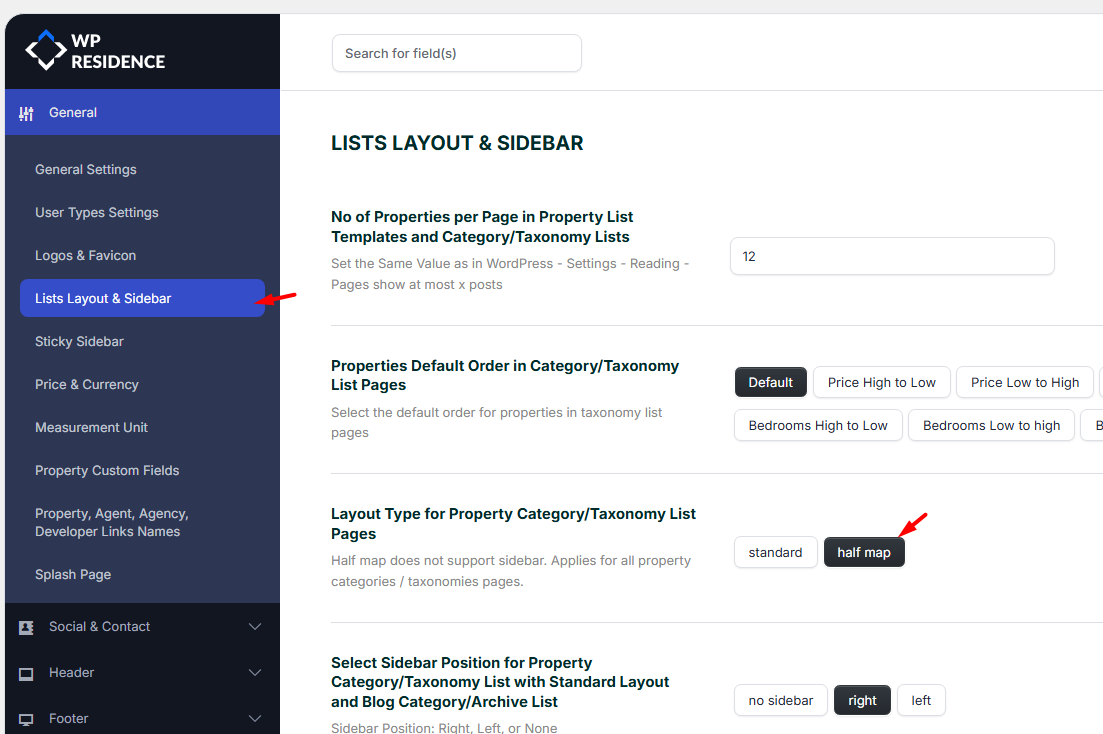
Half Map layout
Half Map layout displays a fixed map area and a property list area. It does not use sidebars.
- Go to Theme Options → General → Lists Layout & Sidebar.
- Select Half Map for taxonomy pages.
Important: Half Map layout requires Google Maps to be enabled and used as the map system.
Half Map pages are map-driven and rely on map rendering and pin synchronization.
Half Map Template settings (layout and presentation)
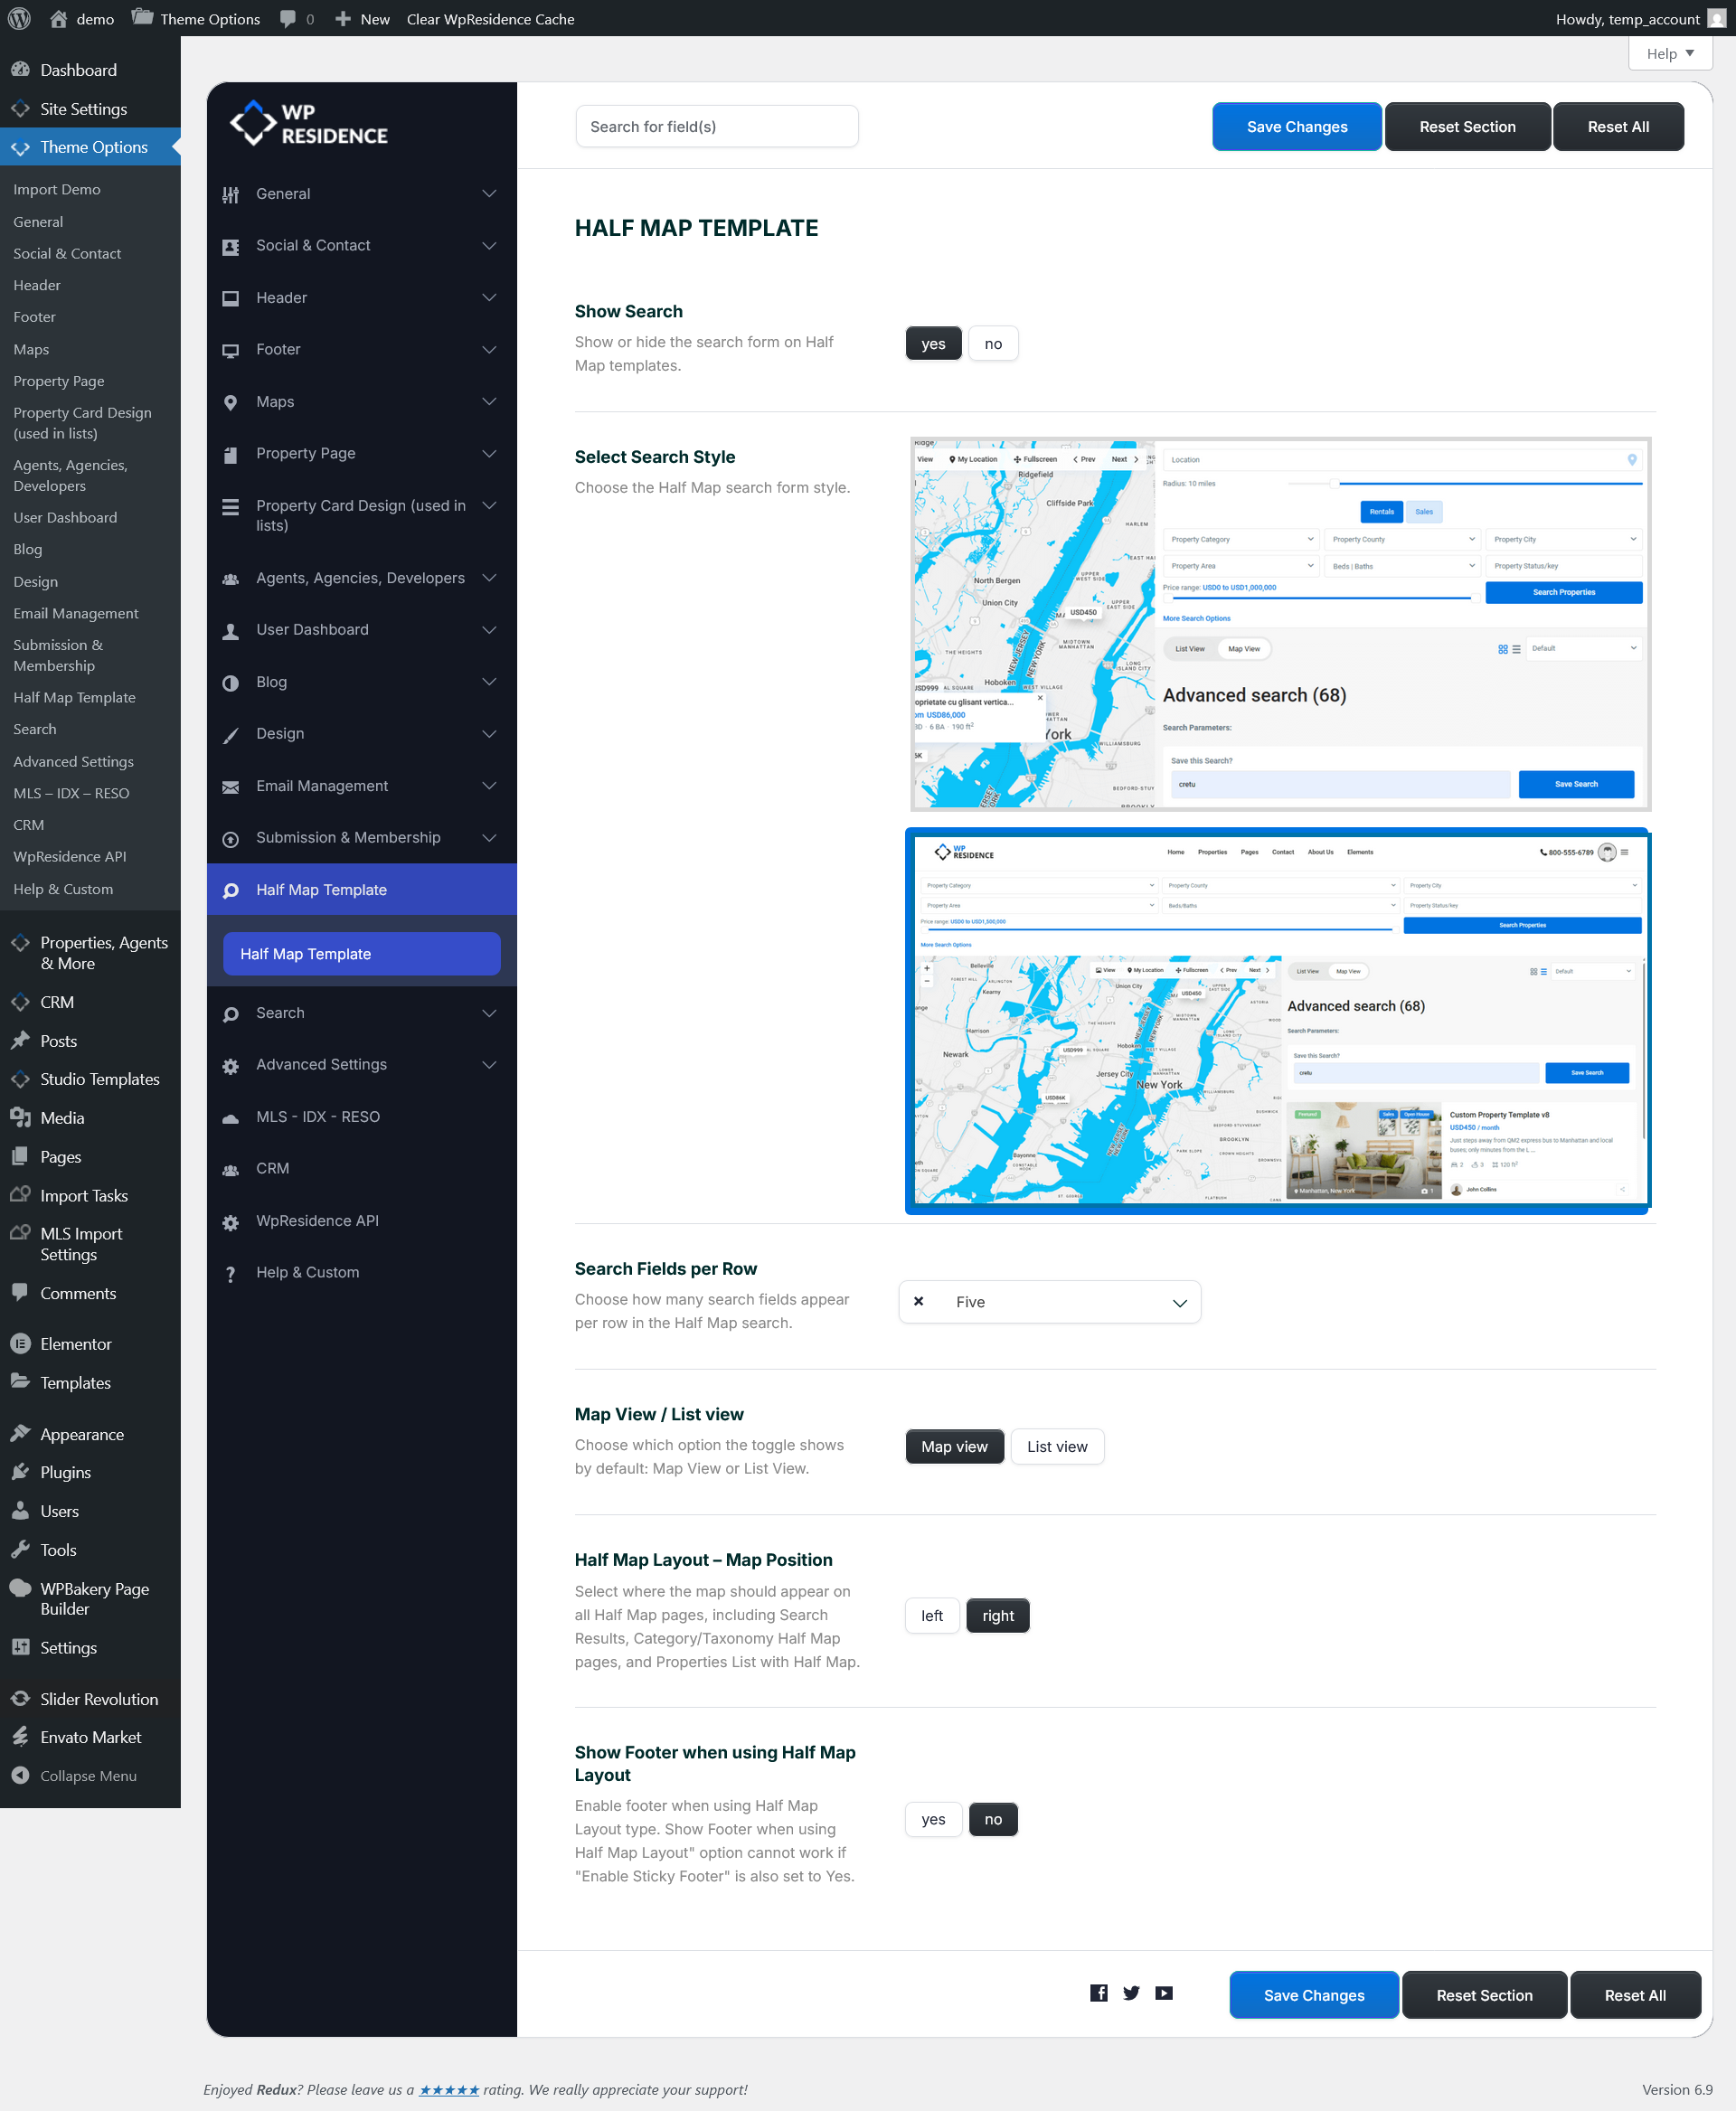
Half Map visual configuration is controlled from:
Theme Options → Half Map Template.
From this section you can configure:
- Show or hide the search bar
- Select which search layout is used
- Control how compact the search fields are
- Choose whether the page opens in Map View or List View
- Set the map position (left or right)
- Decide whether the footer is displayed
These options affect layout and presentation. They do not change which properties match a taxonomy.
Hero Media header for taxonomy pages (Standard layout)
Hero Media controls what appears at the top of taxonomy pages (image, map, slider, or none).
This applies to taxonomy pages using the Standard layout.
To change it:
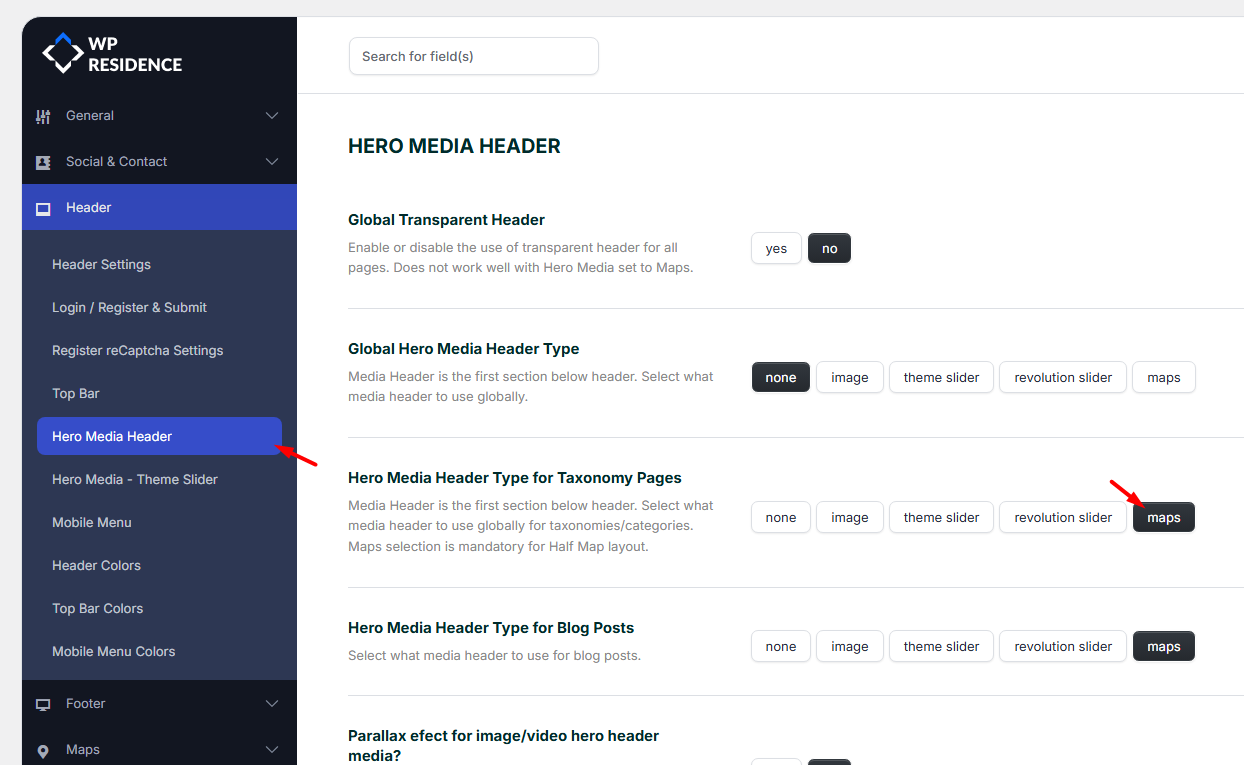
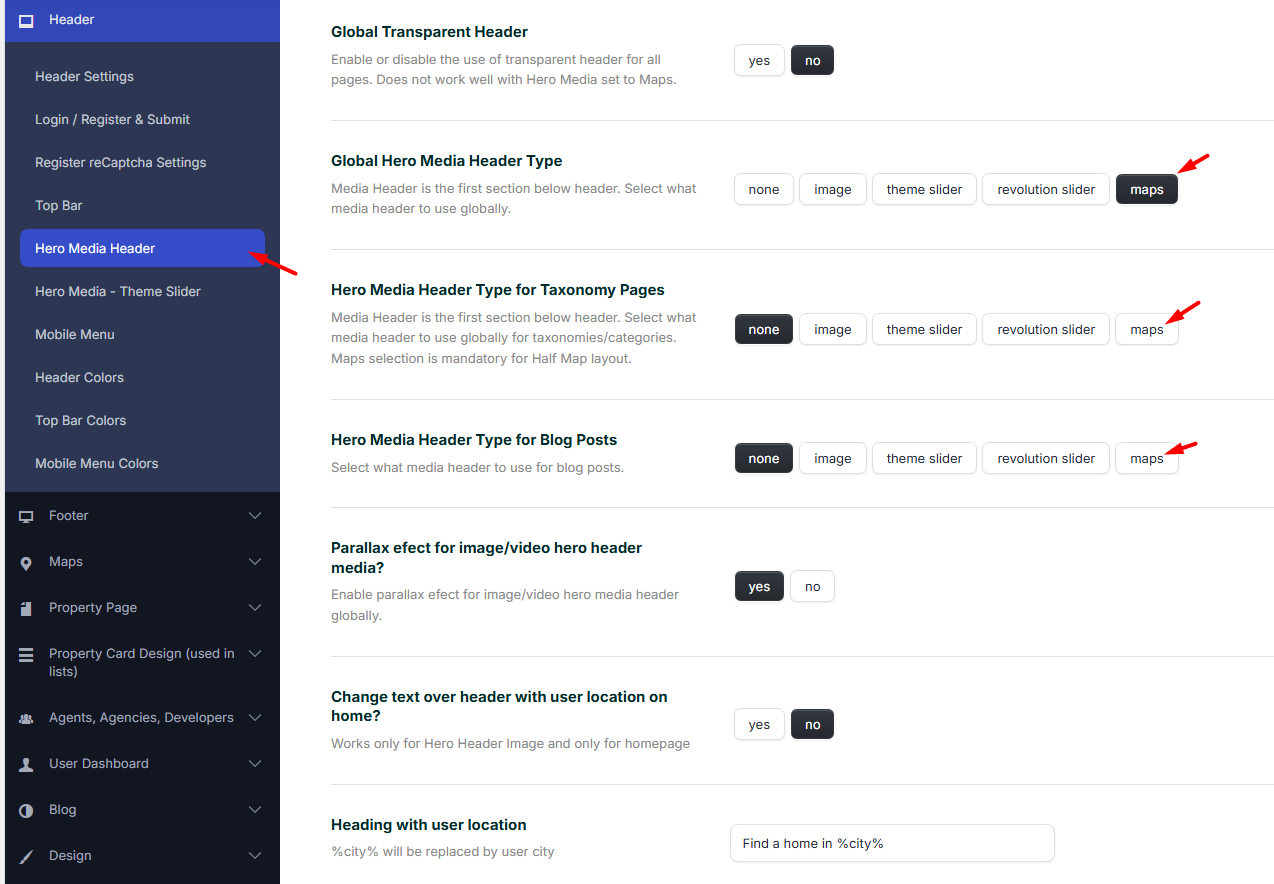
- Go to Theme Options → Header → Hero Media Header.
- Find Hero Media Header Type for Property Category/Taxonomy Pages.
- Select the option you want (Image, Map, Slider, etc.).
Global image vs taxonomy Featured Image
If you want one global image for all taxonomy pages, set the option
Use uploaded Image for City and Area taxonomy page Header? to NO.
If you set that option to YES, WPResidence will use the taxonomy’s Featured Image (when available) instead.
Note: Hero Media options apply to the Standard layout.
Half Map layout uses its own map-based structure and does not behave like a normal hero media header.
Sidebar selection and position (Standard layout)
For taxonomy pages using the Standard layout, you can choose which sidebar is used and where it appears.
- Go to Theme Options → General → Lists Layout & Sidebar.
- Choose the sidebar position (Left, Right, or No sidebar).
- Select the sidebar widget area from the dropdown.
Note: Sidebars only apply to Standard layout. Half Map layout does not use sidebars.
Design custom taxonomy layouts with WPResidence Studio and Elementor
If you want a specific category or taxonomy page to have its own design, you can build custom templates using
WPResidence Studio and Elementor (Free).
This is useful for adding custom text blocks, images, unique layouts, or extra sections to a specific taxonomy.
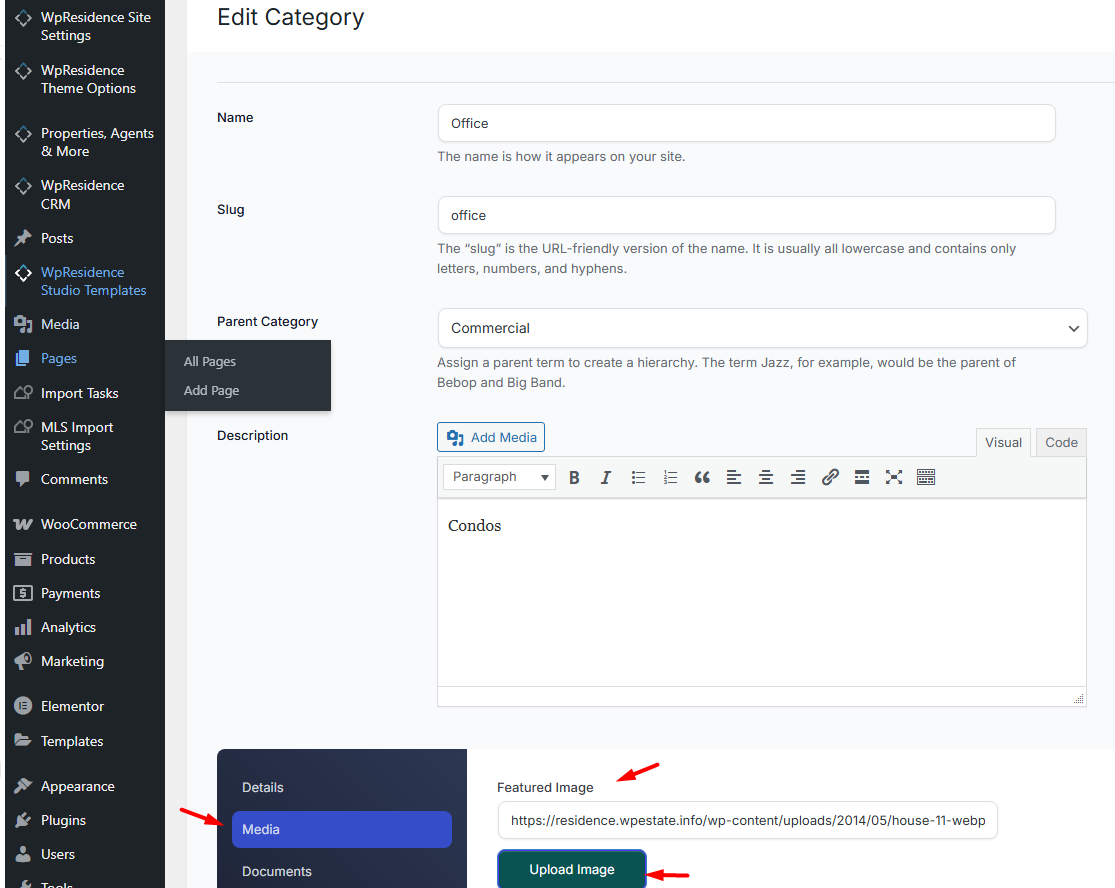
Featured Image for categories and taxonomies
WPResidence allows taxonomy terms (like categories or cities) to have a Featured Image.
This image can be used in widgets, shortcodes, and in some hero media configurations.
How to set a taxonomy Featured Image
- Go to Properties → Categories (or the relevant taxonomy panel).
- Edit the taxonomy term.
- Upload a Featured Image from the Media tab.
- Click Update.
Map zoom behavior on taxonomy pages
When taxonomy pages use Maps as hero media, WPResidence will try to keep the map useful by fitting pins to the results.
- Taxonomy pages can synchronize map pins with the property list.
- The map may auto-adjust zoom to display all pins from the current results.
- If the theme is set to automatically fit pins to results, manual zoom settings can appear ignored because the map recalculates its bounds.
If you need a specific map behavior, review your map settings in Theme Options → Maps and test with real listings and locations.
Add taxonomy fields to Advanced Search (Custom Fields setup)
You can include property taxonomies (Category, Type, City, Area, State, Status) inside the Advanced Search form so visitors can filter listings.
To learn exactly how to add taxonomy fields and control their comparison behavior, use this guide:
How to add taxonomy fields to Advanced Search (Custom Fields setup)
Show categories with 0 properties in search and filters
You can choose to display categories that currently have no properties inside:
- Advanced Search filters
- Properties List filters
This can be useful if you want users to see the full structure of your categories, even before listings are added.
Step-by-step guide:
Show categories with 0 properties in Advanced Search Results and Properties List Filters
State, City, Area dependency: attach Area to City and City to State
WPResidence supports dependent dropdowns for:
State → City → Area.
This means selecting a State filters the City list, and selecting a City filters the Area list.
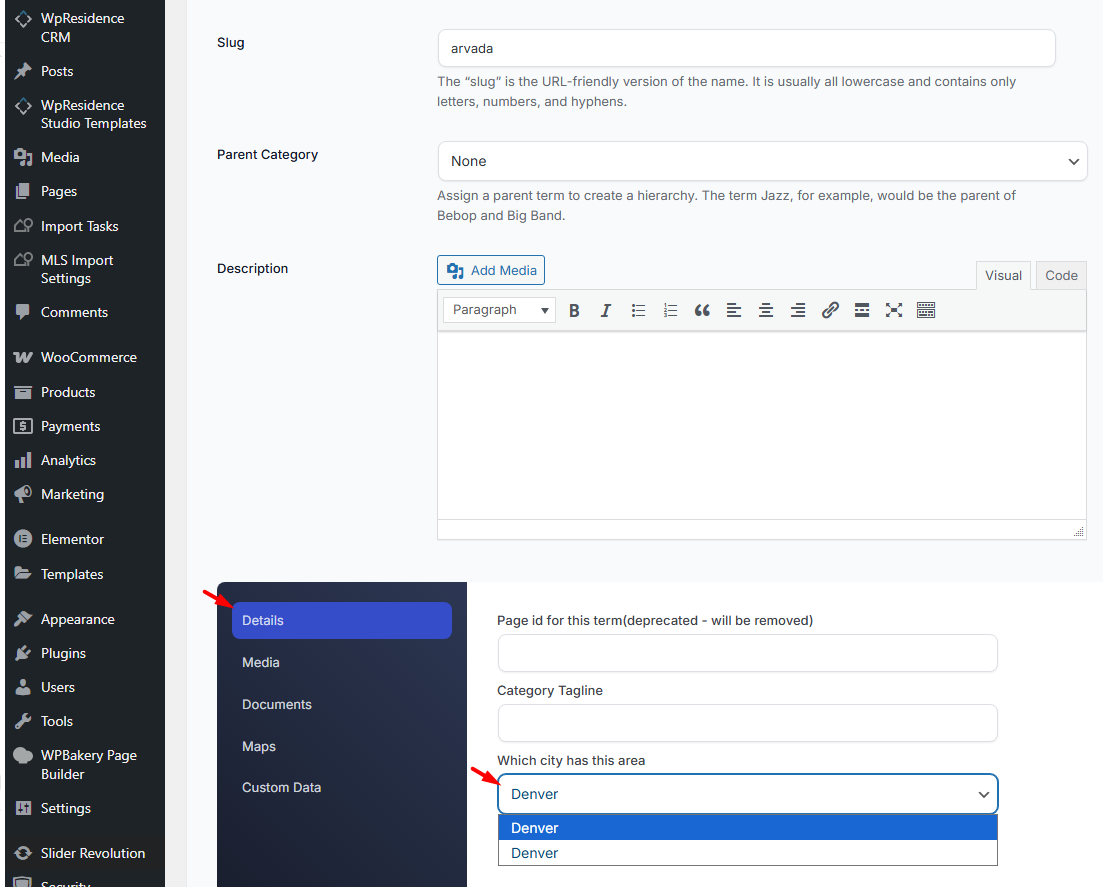
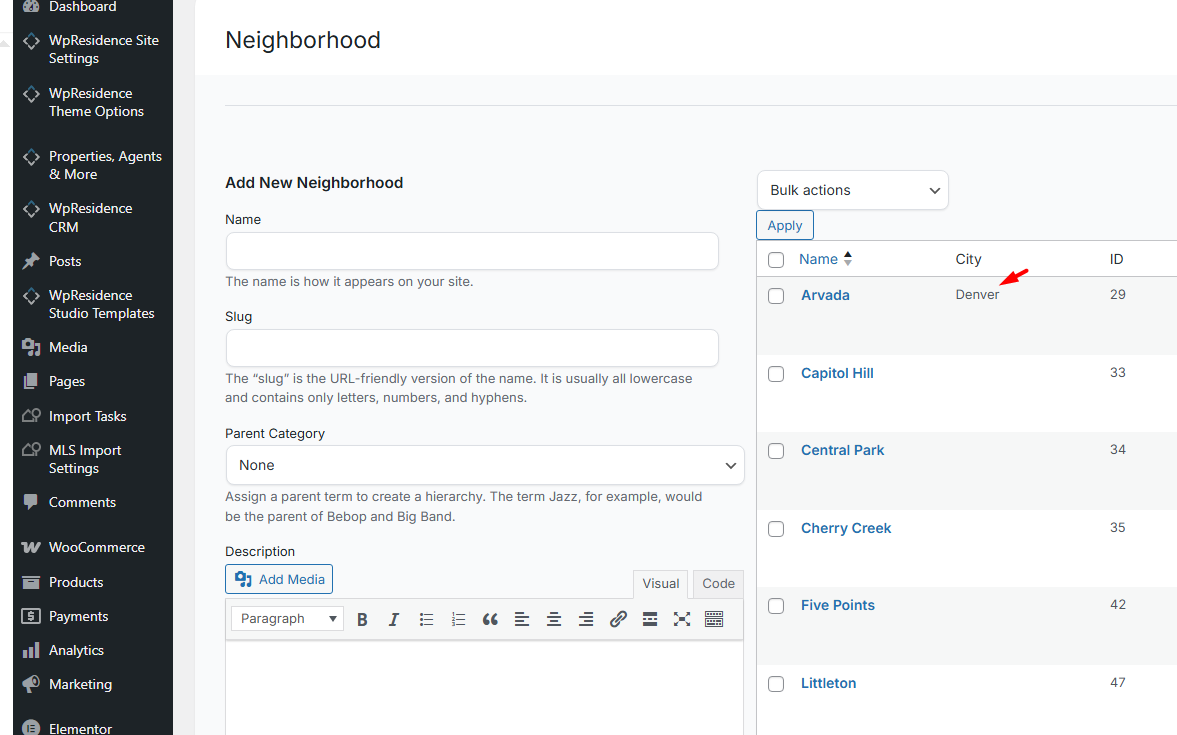
Attach an Area to a City
- Go to the Neighborhood / Area taxonomy panel.
- Add a new Area or edit an existing one.
- From the Details tab, select the City it belongs to.
- Click Update and confirm the Area is attached.

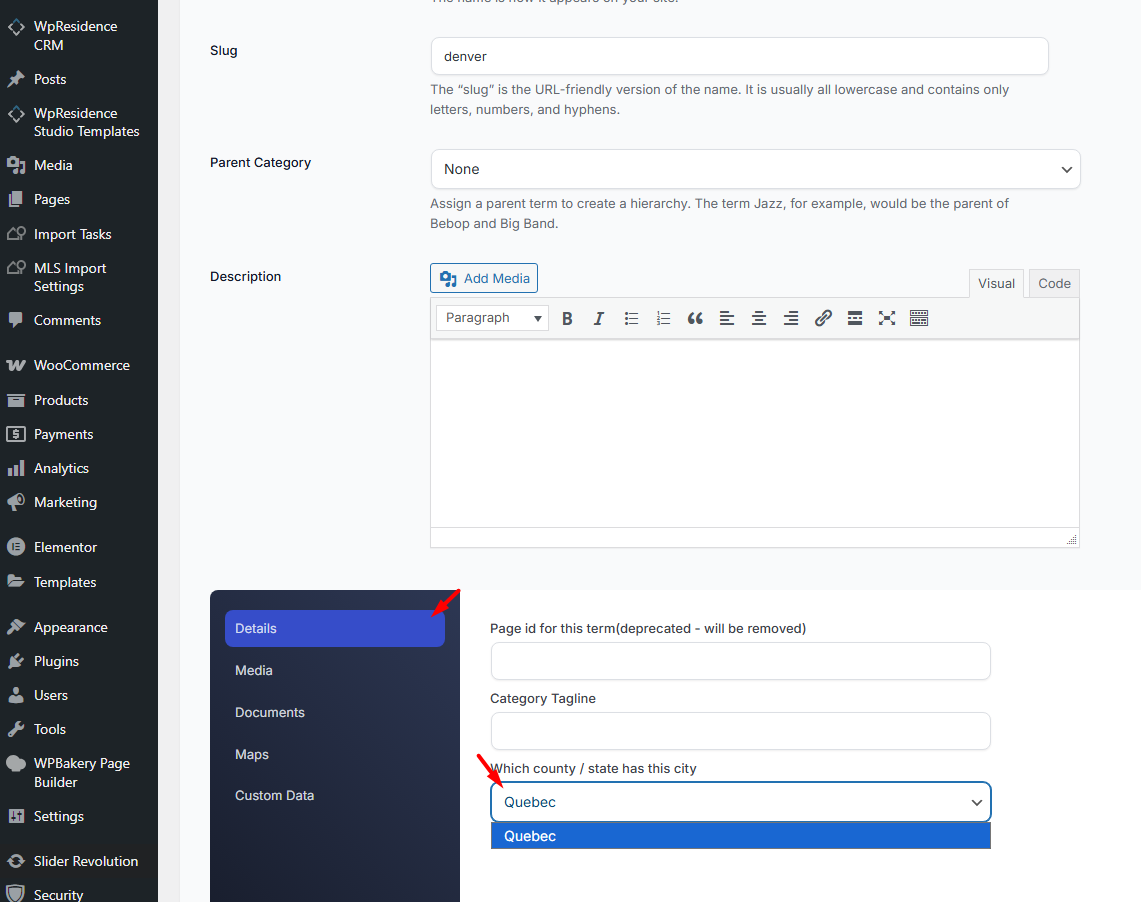
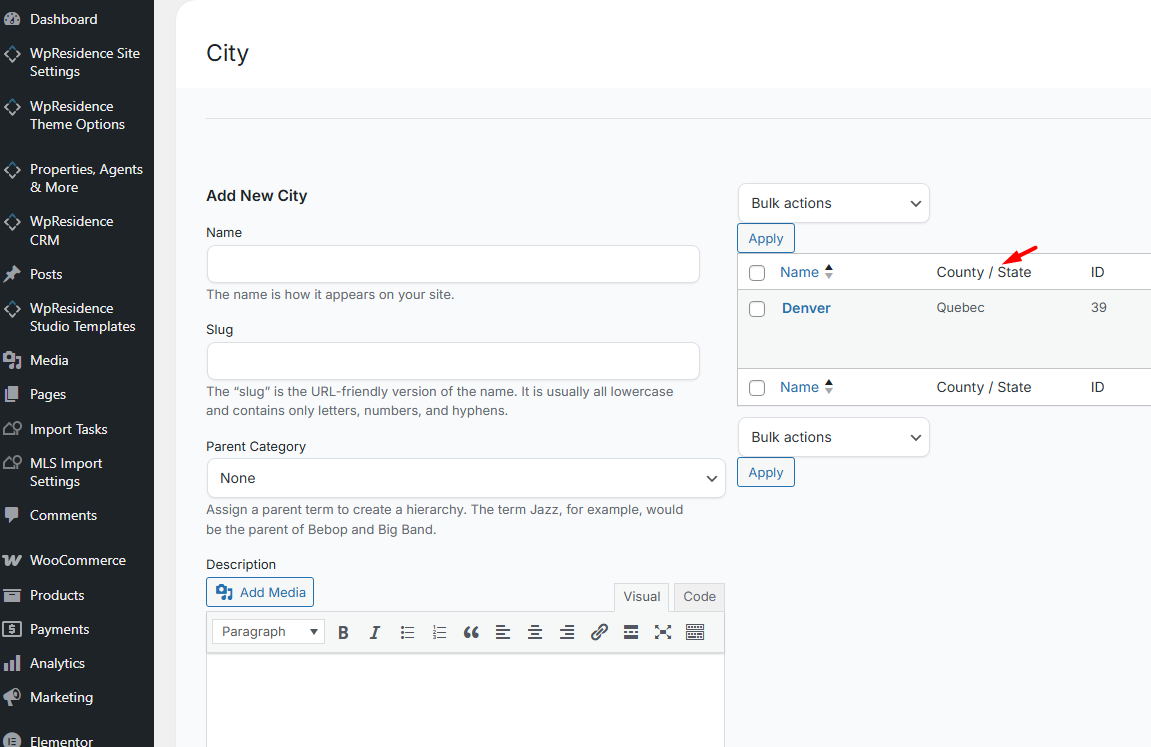
Attach a City to a State
- Edit the city in the Property City taxonomy panel.
- Select the State it belongs to.
- Save (Update) your changes.

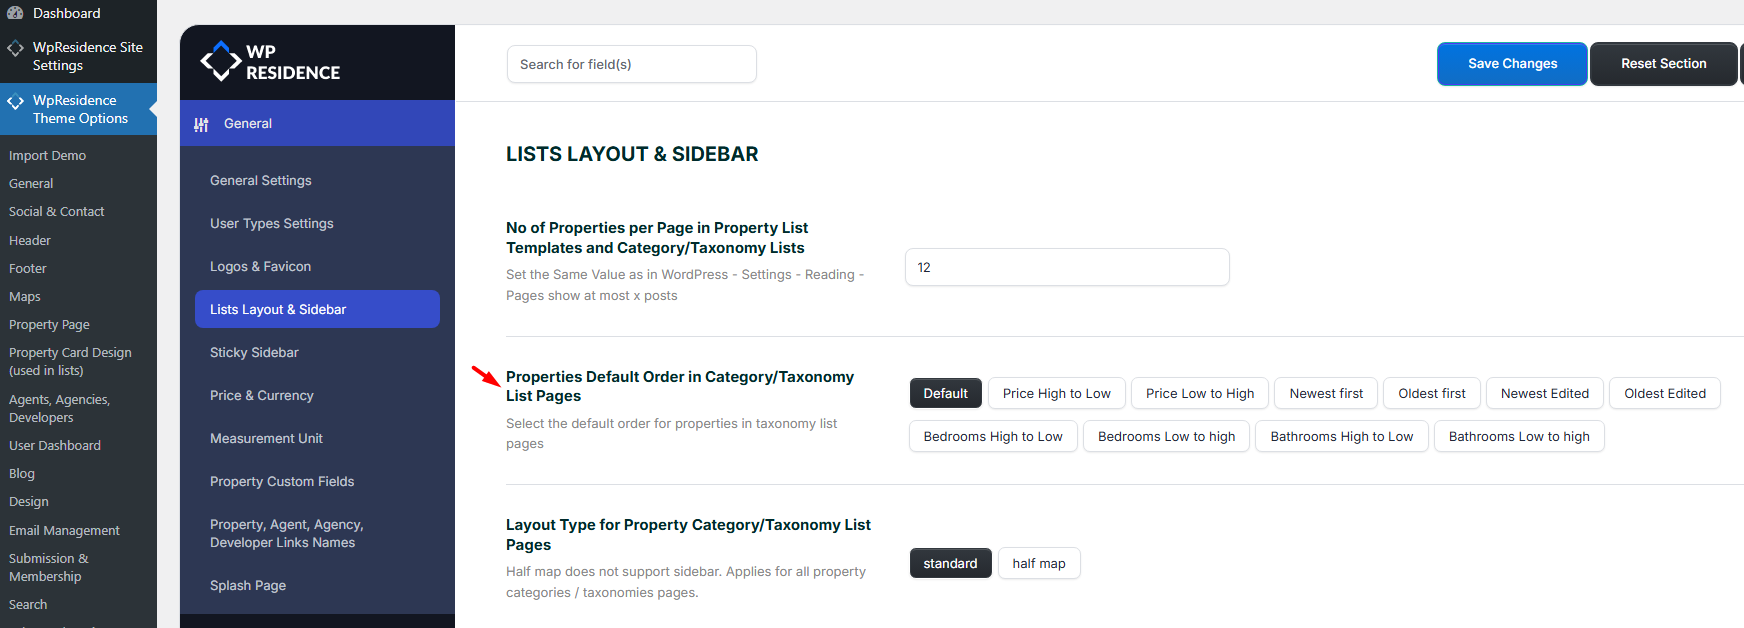
Change the default order of properties on taxonomy pages
The default order for category and taxonomy pages is controlled from:
Theme Options → General → Lists Layout & Sidebar.
Look for: Properties Default Order in Category/Taxonomy List Pages.
Available ordering options:
- Default
- Price High to Low
- Price Low to High
- Newest first
- Oldest first
- Newest Edited
- Oldest Edited
- Bedrooms High to Low
- Bedrooms Low to High
- Bathrooms High to Low
- Bathrooms Low to High
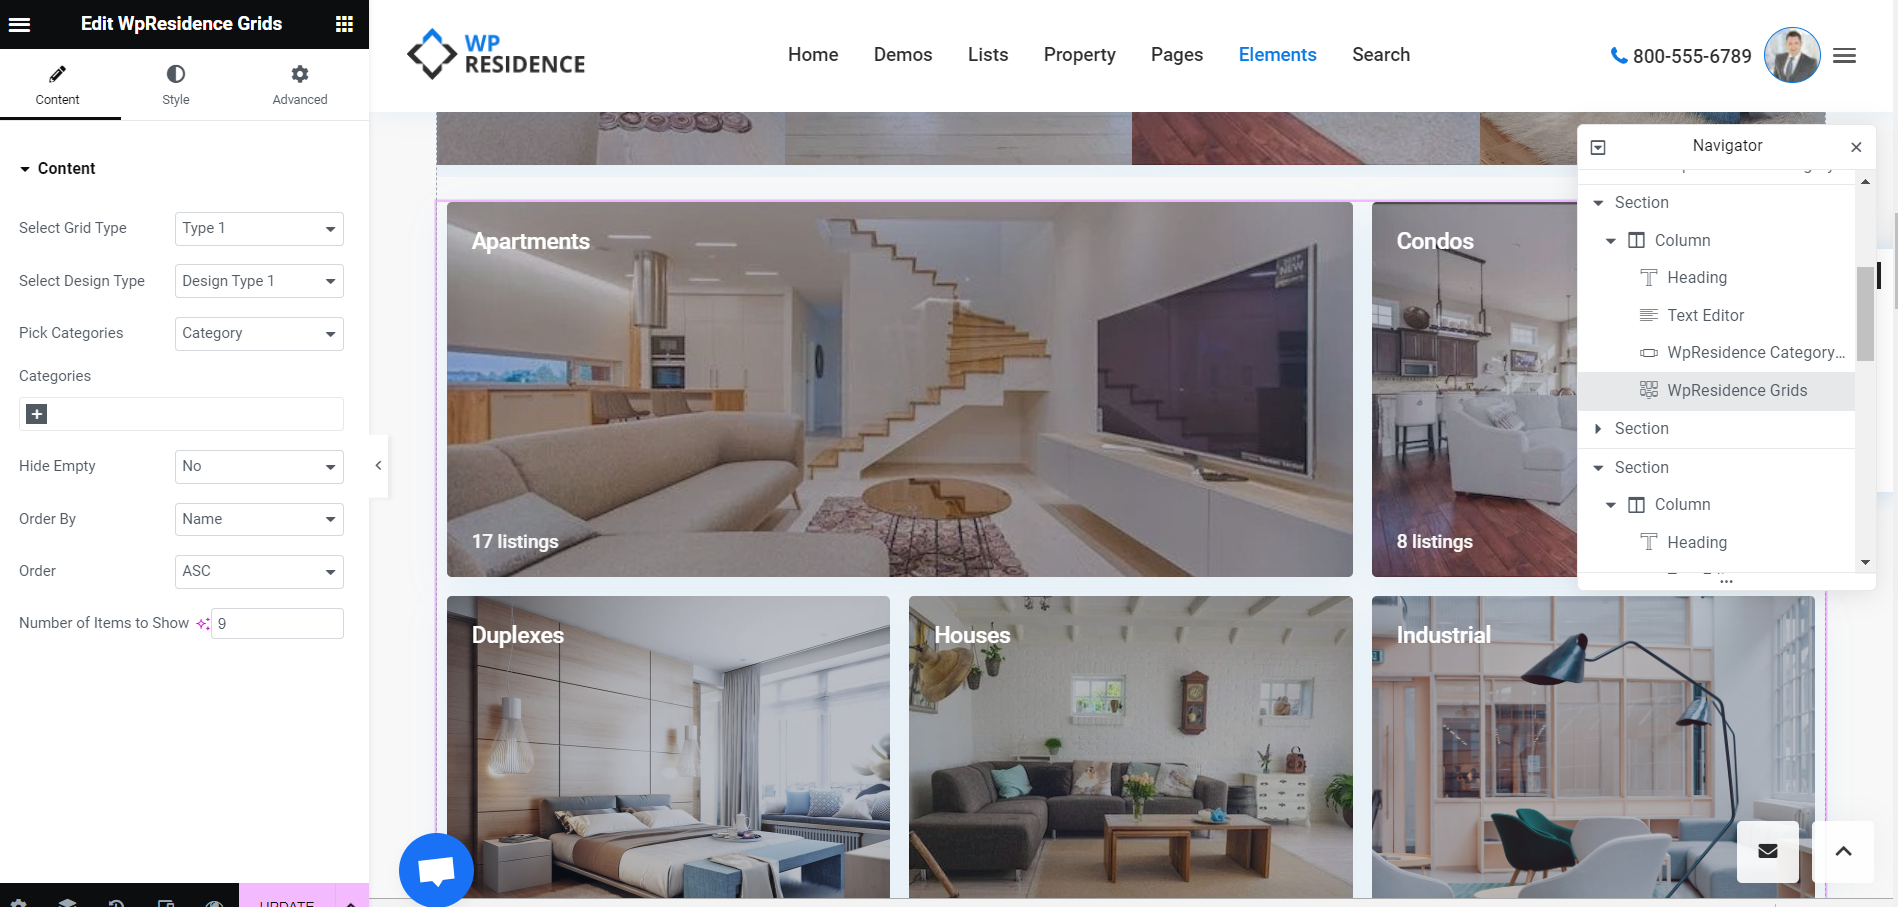
Display categories using theme widgets and shortcodes
WPResidence includes multiple ways to display categories on pages, such as tabs, grids, sliders, and shortcode blocks.
These tools are useful when you want visitors to browse by category visually rather than through menus.
Display Categories as Tabs (Elementor widget)
Display Categories Shortcode
Categories Slider
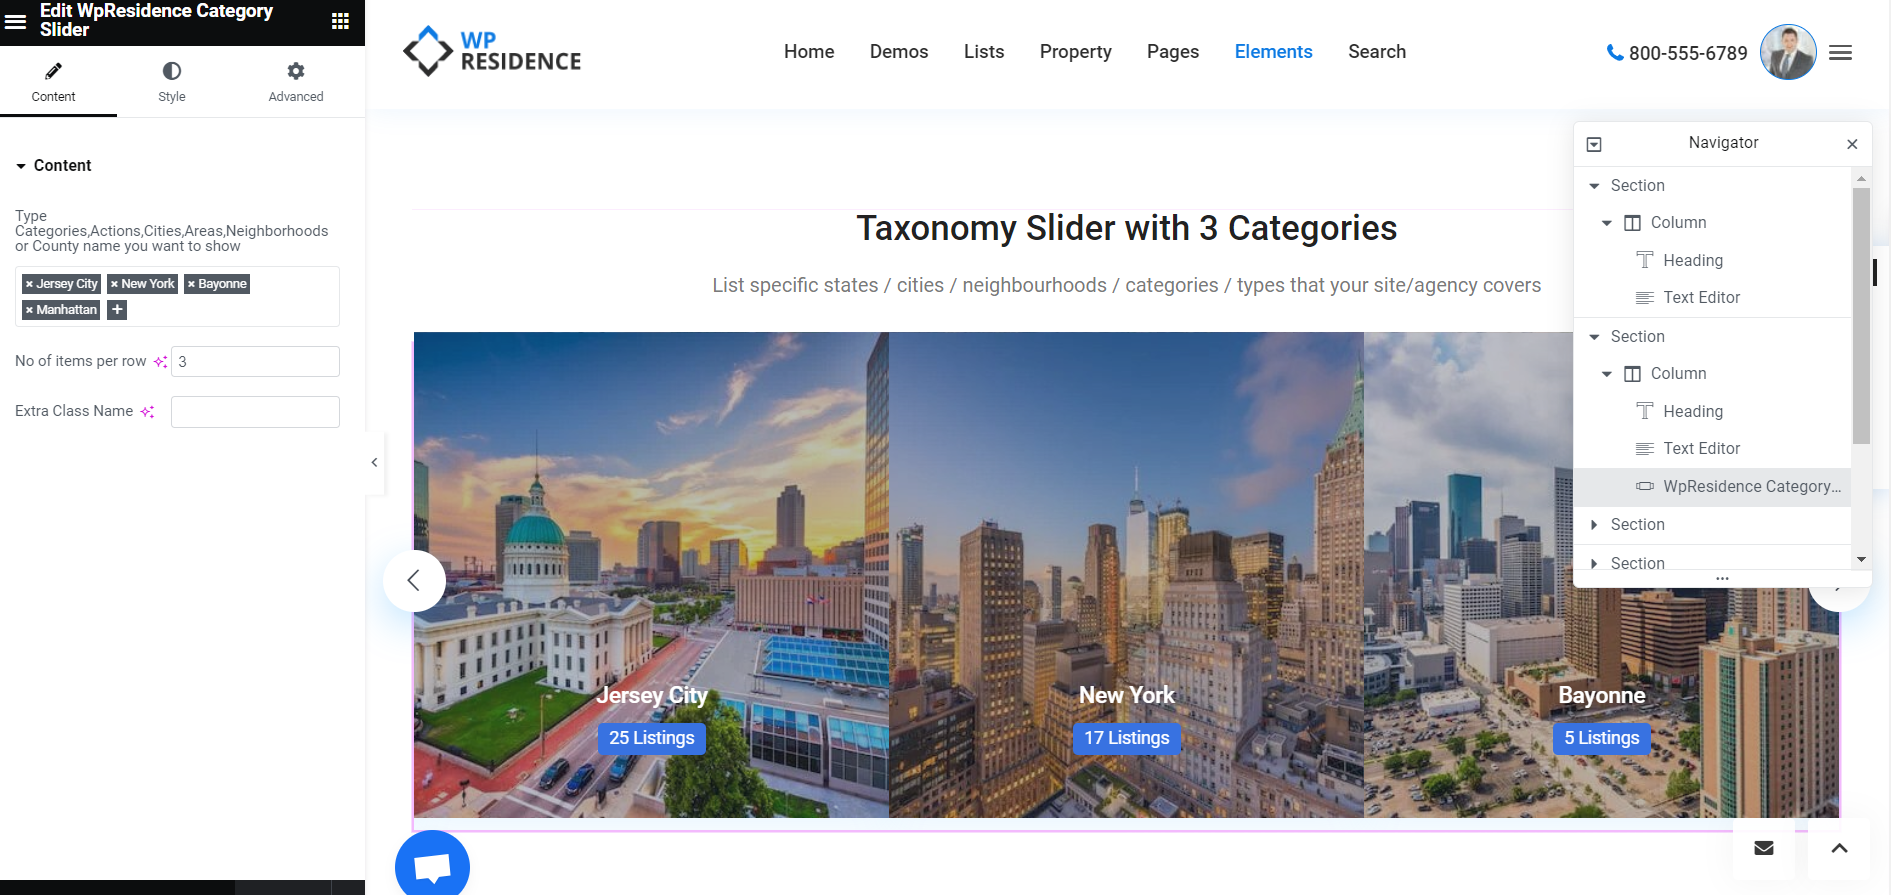
Categories Grid