
What WPResidence Design Studio templates are
WPResidence Design Studio gives you access to pre-built Elementor templates that can be imported into your website.
You can use these templates to quickly create professional pages, sections, headers, footers, property layouts, and other theme template designs without starting from scratch. The templates can be customized with Elementor Free after import.
WPResidence Studio can be used for:
- Pre-built Elementor demo pages
- Pre-built Elementor sections
- Custom headers and footers
- Property templates
- Property category/taxonomy templates
- Agent, agency, and developer templates
- Blog post templates
- Mega menu templates
- Other WPResidence layout templates
You can also use WPResidence Studio to build custom headers and footers.
Video guides
Import pre-built Elementor demo pages or sections
Create templates with WPResidence Studio
Install and activate WPResidence Studio
Install the WPResidence Elementor Design Studio plugin.

Activate the plugin from:
Appearance > Install Plugins
or from:
WPResidence > Site Settings > Plugins
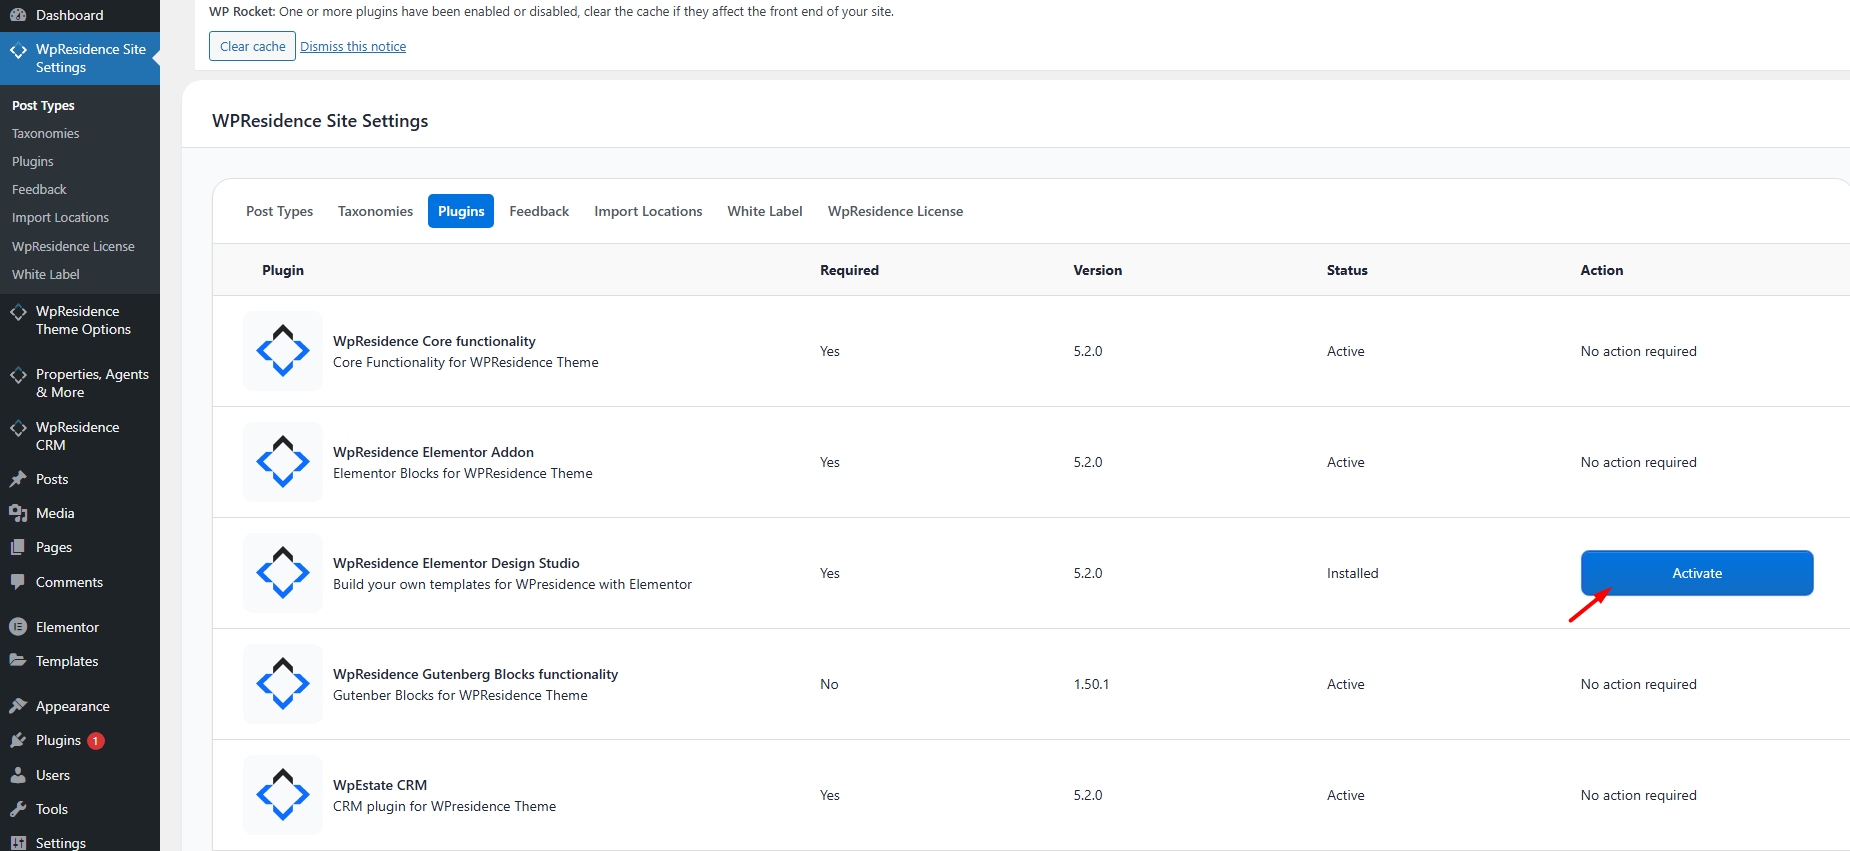
After the plugin is active, the Studio templates and the pre-built template library are available in your WordPress admin.
Create a new page
To import a pre-built Elementor page or section, first create a new page.
Go to:
Pages > Add New
Add a title for the page. You can change the title later if needed.

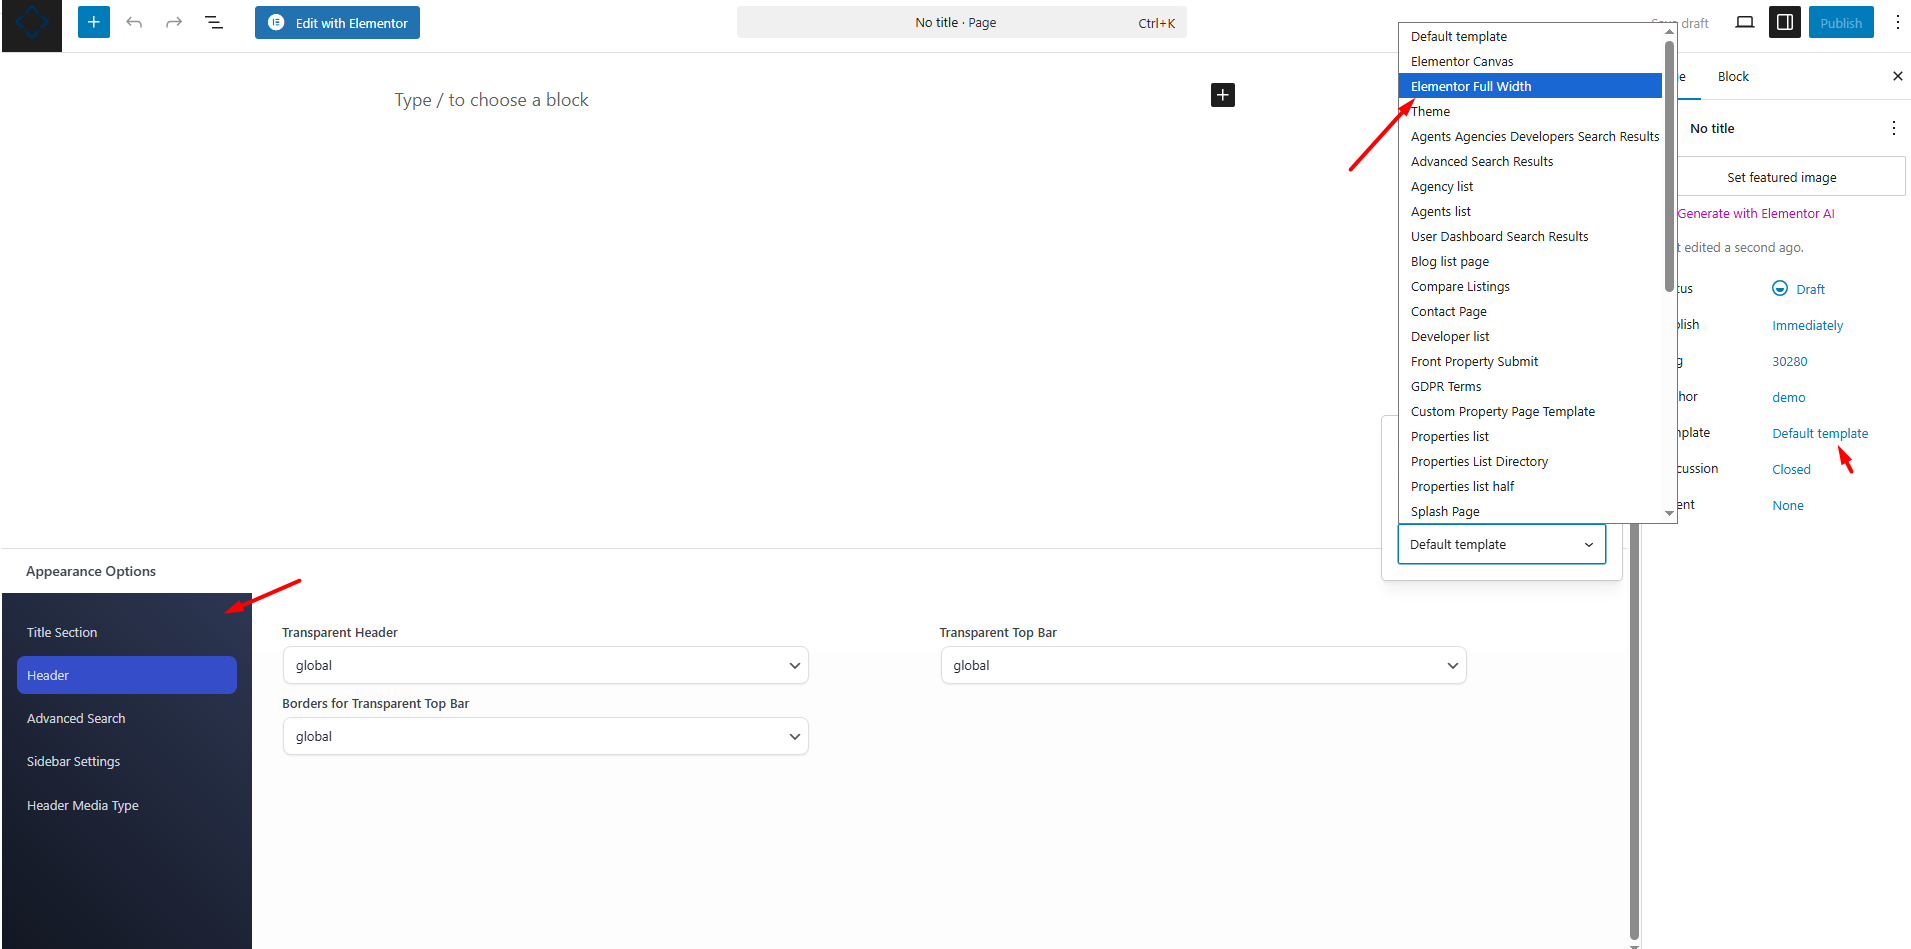
Manage page appearance options
Before importing the template, check the WPResidence page options.
In the page editor, locate the WPResidence Page Settings or Appearance Options section.
From this section, you can manage options such as:
- Page Hero Header: choose the header style or disable the hero header if it is not needed.
- Transparent Header: enable or disable the transparent header for this page.
- Search Display: choose if the search form should show on this page.
These settings affect the page around the Elementor content. The imported Elementor design is still edited from Elementor.
Choose Elementor Full Width template
To make sure the imported layout uses the full width of the page, select the Elementor Full Width template.
In the page editor, go to the Page Attributes section and find the Template dropdown.
Select:
Elementor Full Width
Import a page template or section template
After the page is created and the page options are set, you can import a page or section template from WPResidence Design Studio.
To import a template:
- Click Edit with Elementor to open the Elementor editor.
- Click the Folder icon in Elementor.
- Open the WPResidence Design Studio Templates library.
- Choose the page or section template you want to use.
- Click Insert to add the template to your page.


Use this method when you want to import a normal Elementor page design or a reusable section inside a page.
Import a pre-built design into a WPResidence Studio template
WPResidence Design Studio can also import pre-built designs into Studio templates, such as:
- headers,
- footers,
- property pages,
- property category pages,
- agent pages,
- agency pages,
- developer pages,
- blog post templates, and
- mega menu templates.
The Studio template must be created first. The pre-built design is imported after the template exists.
To import a pre-built design into a Studio template, go to:
WPResidence Studio > Studio Templates
Then follow these steps:
- Click to create a new Studio template.
- Select the template type you need. For example: Header, Footer, Property Page, Property Category, Agent, Agency, Developer, Blog Post, or another available template type.
- Add a name for the template.
- Publish the template.
- After publishing, edit the template with Elementor.
- Use the Studio icon or Elementor template library option to open the WPResidence Studio pre-built designs.
- Select the pre-built design you want to import.
- Click Insert to import it into the template.
- Edit the content, images, address, social links, footer columns, menu widgets, property widgets, or any other details needed.
- Update the Elementor template.
- Set or review the template display conditions/options so the template appears where needed.
- Clear cache and test the front end.
Help for header / footer https://help.wpresidence.net/article/how-to-create-custom-header-footer-with-header-footer-builder/
Help for mega menu https://help.wpresidence.net/article/mega-menu-with-wpresidence-studio/
Help for property category https://help.wpresidence.net/article/how-to-create-a-custom-template-for-each-property-category-taxonomy-with-wpresidence-studio-and-elementor-free/
Help for agent, agency, developer https://help.wpresidence.net/article/how-to-create-a-custom-agent-agency-or-developer-template-with-wpresidence-studio-elementor-free/
Help for custom blog post https://help.wpresidence.net/article/how-to-create-a-custom-blog-post-template-with-wpresidence-studio-elementor-free/
Help for property https://help.wpresidence.net/article/create-a-custom-property-template-with-elementor/
Customize and publish
After importing the template, edit it with Elementor.
You can customize:
- Text
- Images
- Colors
- Spacing
- Sections
- Widgets
- Links and buttons
- Address and contact details
- Social links
- Footer columns
- Property widgets and dynamic content
When the page or template is ready, click Publish or Update to save the changes.

If the imported design does not look as expected, check that the page uses the Elementor Full Width template, review the WPResidence page appearance options, and clear cache after saving the page.
Important notes
- The WPResidence Design Studio plugin must be installed and active before importing templates.
- The plugin being active does not automatically add Studio templates to the website.
- For normal pages, create the page first, edit it with Elementor, then import the page or section template.
- For Studio templates, create the Studio template first, publish it, edit it with Elementor, then import the pre-built design.
- Use the correct Studio template type for the design you need.
- After importing a pre-built template, edit the demo text, images, links, contact details, social links, and any other sample content.
- For headers and footers, make sure the template is assigned/displayed where needed.
- For property, category, agent, agency, developer, or blog templates, make sure the template display options match the area where it should apply.
- Clear cache after saving templates or pages.
- Check the design on desktop, tablet, and mobile.
Related help
How to create a custom header/footer with WPResidence Studio
Mega Menu with WPResidence Studio
How to create a custom template for property category/taxonomy pages
How to create a custom Agent, Agency, or Developer template