The WPResidence Translate plugin (internal name WPEstate Translate) is the official translation management layer built specifically for the WPResidence and WPRentals themes. It lets you run a true multi-language real estate website — translating properties, agents, pages, menus, theme strings, and taxonomies — without relying on a third-party plugin.
This article is an orientation: what the plugin is, what it is not, and how to find your way around its admin menu. Each section listed here has its own dedicated article that goes deeper.
What WPResidence Translate Does
WPResidence Translate gives your site one complete translation system that covers everything a multilingual real estate website needs:
- Language management — add, enable, reorder, and set a default language for your site.
- Content translation — create language variants of posts, pages, properties, agents, agencies, and developers, and link them together.
- Theme & plugin string translation — translate every UI string WPResidence outputs (button labels, filters, form fields, emails).
- Taxonomy translation — translate property categories, locations, features, and any custom taxonomy terms.
- Custom field rules — decide, per meta field, whether a value should be copied across languages or translated independently.
- Automatic translation — use OpenAI, Google Translate, DeepL, or Microsoft Azure to pre-fill translations.
- Menu synchronization — keep navigation menus in sync across languages, with optional language-specific menu locations.
- Language-aware URLs — each language gets its own URL prefix with correct canonical and hreflang handling.
How It Compares to WPML and Polylang
WPResidence Translate is purpose-built for WPResidence. It understands property custom fields, search forms, agent grids, Elementor widget IDs, and the WPResidence admin options out of the box — none of which require extra glue code or compatibility add-ons. If you already run WPResidence, this is the path of least resistance for a multilingual site.
Where to Find the Plugin in wp-admin
Once activated, a new top-level menu labeled WPEstate Translate appears in the WordPress admin sidebar (translation icon, positioned near the Comments area).
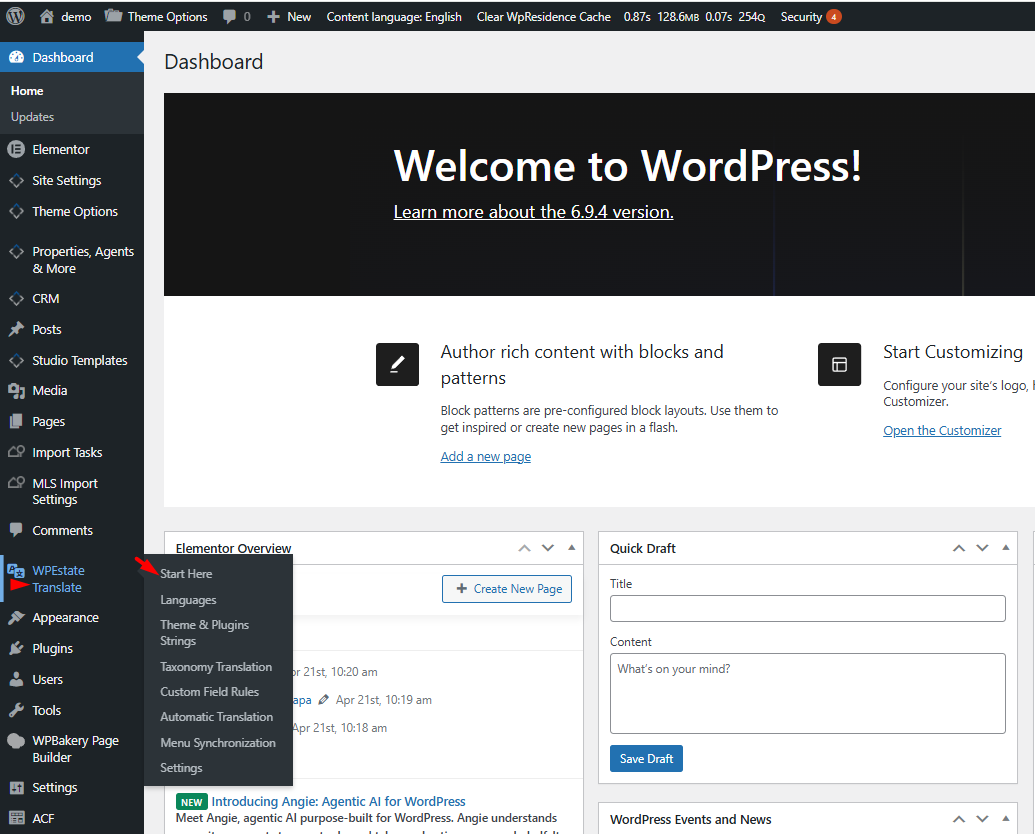
The menu contains the following pages:
| Menu entry | What it is for |
|---|---|
| Start Here | The landing page. Quick setup steps with shortcut buttons to each configuration screen. |
| Languages | Add, remove, reorder, and mark the default language. Pick display name and flag per language. |
| Theme & Plugins Strings | Scan and translate hardcoded strings from the theme and installed plugins. |
| Taxonomy Translation | Enable which taxonomies should be translatable (property categories, locations, features, etc.). |
| Custom Field Rules | Per-meta-key rules that decide whether a custom field is copied across languages or translated. |
| Automatic Translation | Configure API keys for OpenAI, Google, DeepL, or Microsoft Azure and run auto-translation jobs. |
| Menu Synchronization | Keep WordPress navigation menus aligned across languages. |
| Settings | Global plugin configuration: default language, URL prefix mode, browser detection, switcher style, cache tools, reset. |
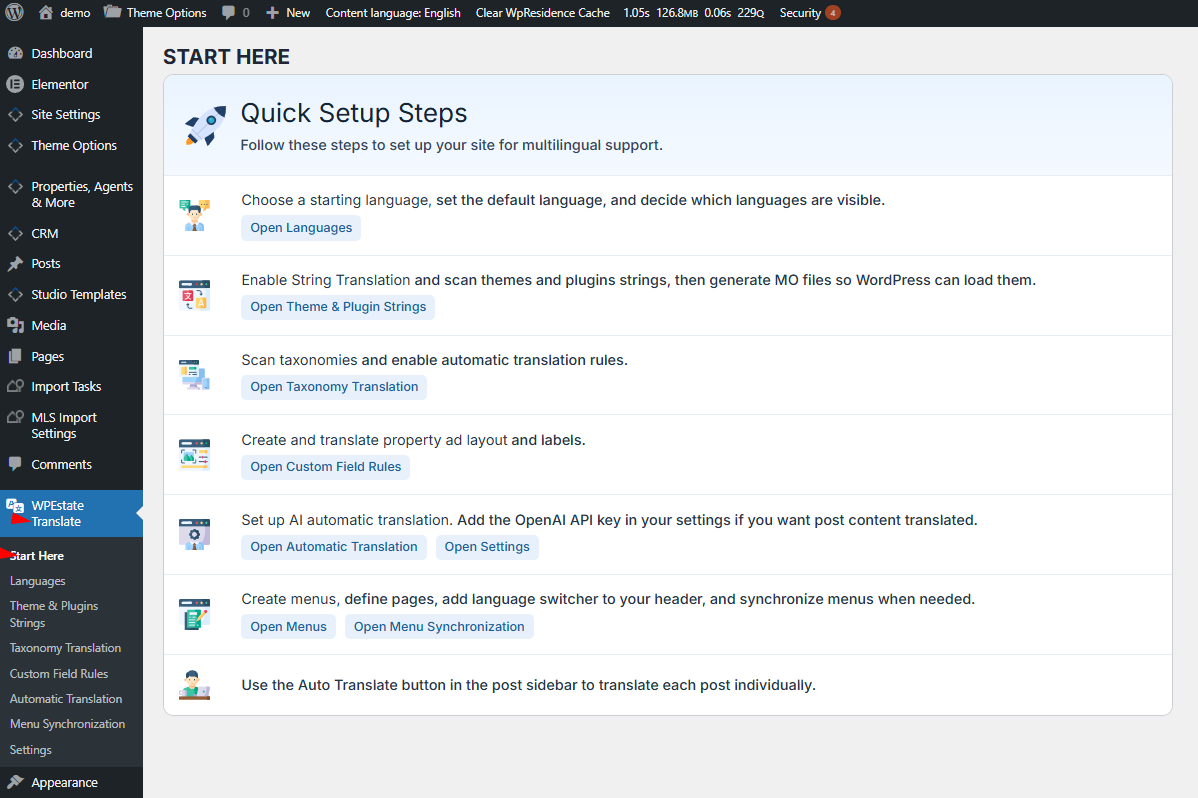
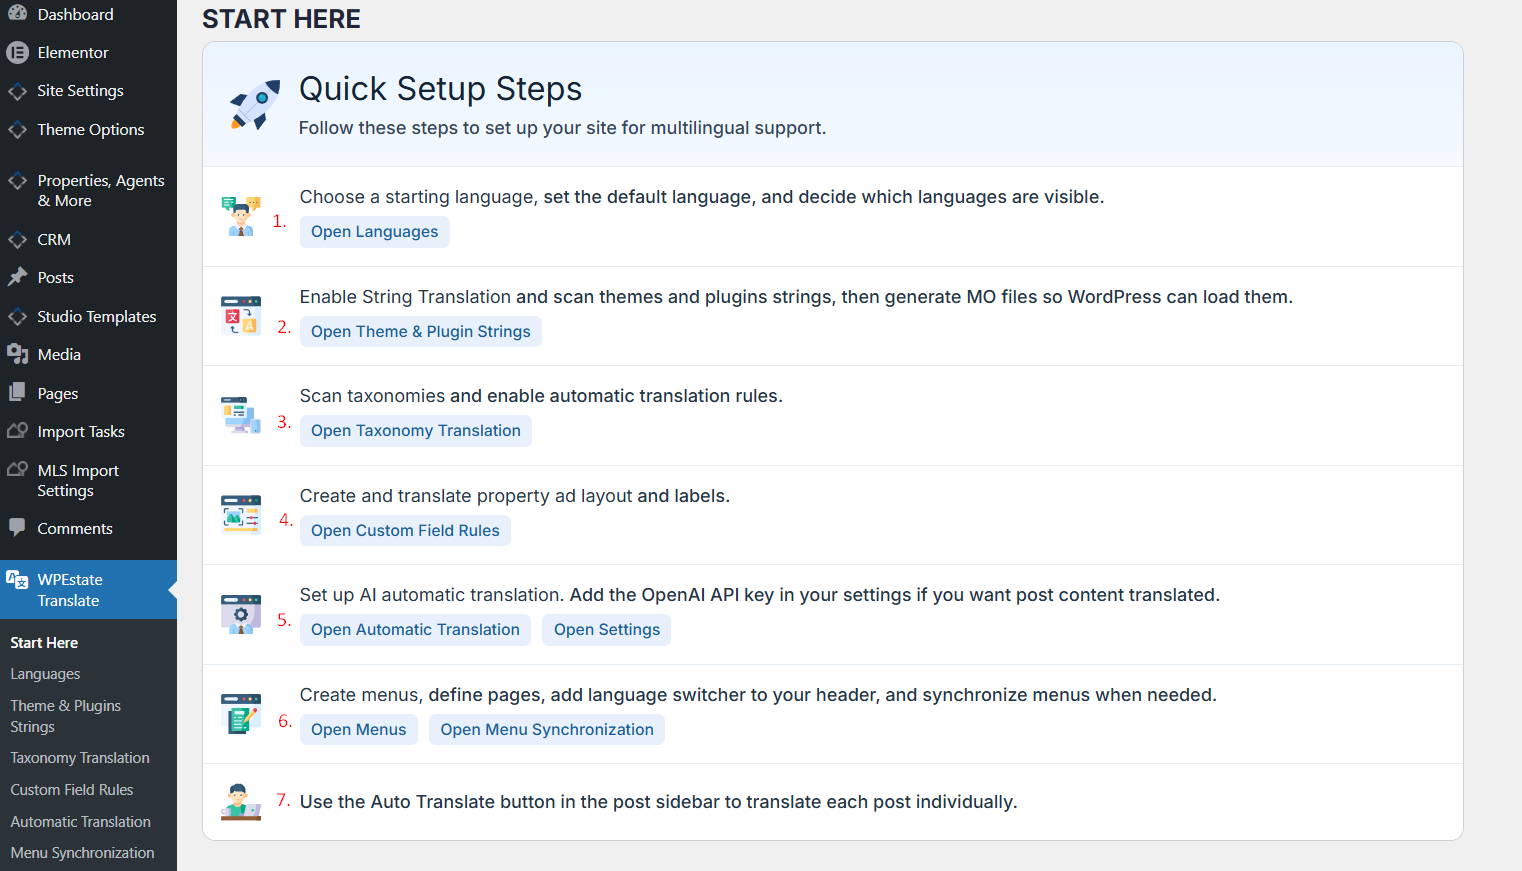
The Start Here Landing Page
The first page you see after activation is Start Here. It walks you through the recommended setup order:
- Choose a starting language and decide which languages are visible.
- Enable string translation, scan theme and plugin strings, generate MO files.
- Scan taxonomies and enable automatic translation rules.
- Review custom field rules for property meta.
- Configure an automatic translation provider.
- Synchronize your menus.
- Review global Settings and go live.
Each step on the page has a shortcut button that jumps to the right screen.
Two Helpful UI Controls Outside the Menu
In addition to the dedicated menu, two switchers appear elsewhere in wp-admin once you have more than one language configured:
- Admin bar language switcher — a dropdown in the top WordPress toolbar that changes the language you are editing in.
- Editor header language selector — a language picker shown at the top of the post/page editor, so you can switch between translations of the post you are editing.
Both are covered in detail in the Admin Bar & Editor Header Language Switchers article.
Non-Latin Language Support
The plugin fully supports non-Latin alphabets (Cyrillic, Arabic, Hebrew, Chinese, Japanese, Korean, Thai, Greek, and others). Language names, slugs, translated content, and search queries all preserve UTF-8 characters end-to-end.
What Happens at Activation
When you activate the plugin, it performs a few one-time tasks automatically:
- Creates its own database tables for translations, strings, slugs, glossary, translation memory, and languages.
- Seeds a predefined catalog of available languages.
- Detects your site locale and adds it as the default language.
- Writes sensible default settings (URL prefix enabled, browser detection enabled, dropdown switcher style).
- Flushes rewrite rules so language-aware URLs start working immediately.
You can read more about the full activation lifecycle — and the safe uninstall path — in the Installation, Activation & Uninstall article.
What To Read Next
- Installation, Activation & Uninstall — what the plugin adds to your database and how to remove it cleanly.
- Managing Languages — how to add your second (or tenth) language.
- Translating Posts & Pages — the day-to-day editor workflow.
- Settings Page — every global option explained.
If you are evaluating the plugin for a new project, the best starting point is our full guide on building a multi-language real estate website with WPResidence.