The Languages page is the control center for every language that appears on your WPResidence site.
From here you choose which languages visitors can switch to, which language is the default, which flag is shown in the switcher, and the order in which languages appear.
This article explains the screen field by field, including the generated translation files and the wpr folder used by WPEstate Translate.
- Where to Find It
- Adding a Language From the Catalog
- Adding a Custom Language
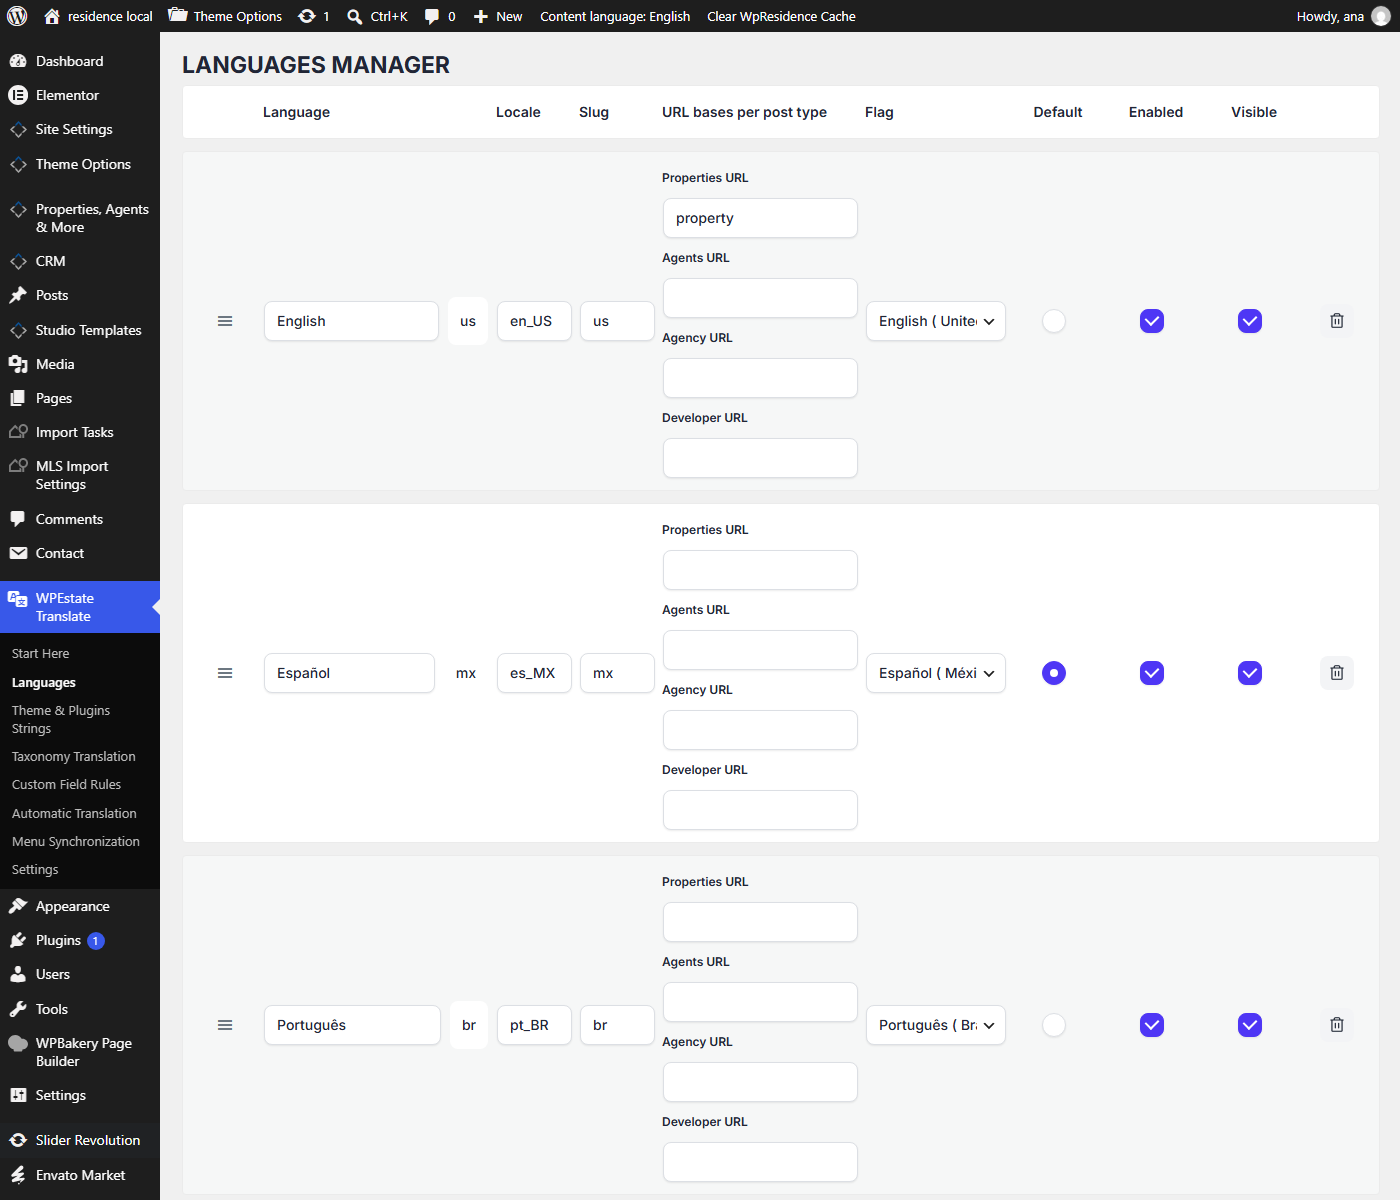
- Fields in the Languages Grid
- Setting the Default Language
- Reordering Languages
- Enabled vs Visible — What is the Difference
- Generated Translation Files and the
wprFolder - Why You May See More Than One File for the Same Language
- Theme, Plugin, and WPEstate Translate Files
- Removing Unused Generated Files
- Removing a Language
- Non-Latin Languages
- Typical Setups
- What Happens After You Save
- What To Read Next
Where to Find It
In the WordPress admin sidebar, open WPEstate Translate > Languages.
You need the manage_options capability, usually the administrator role, to see this page.
The heading reads Languages Manager.
Adding a Language From the Catalog
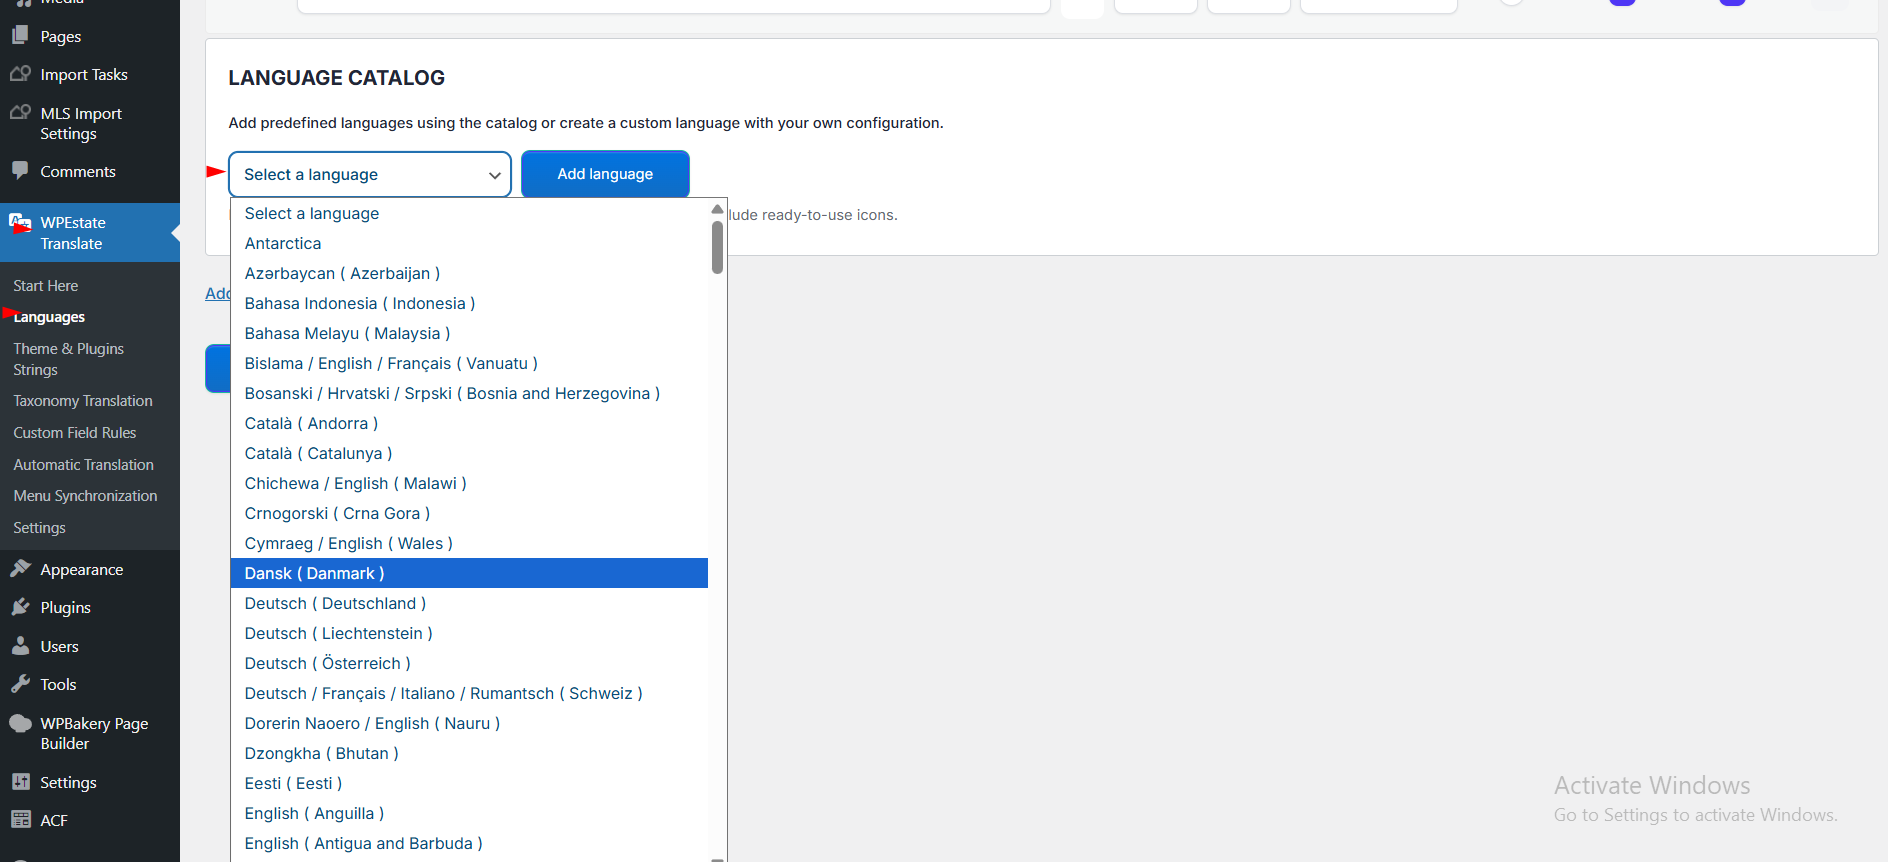
WPResidence Translate ships with a built-in catalog of more than 200 languages, each preloaded with an ISO code, locale, slug, and flag icon.
Adding one is a two-click process:
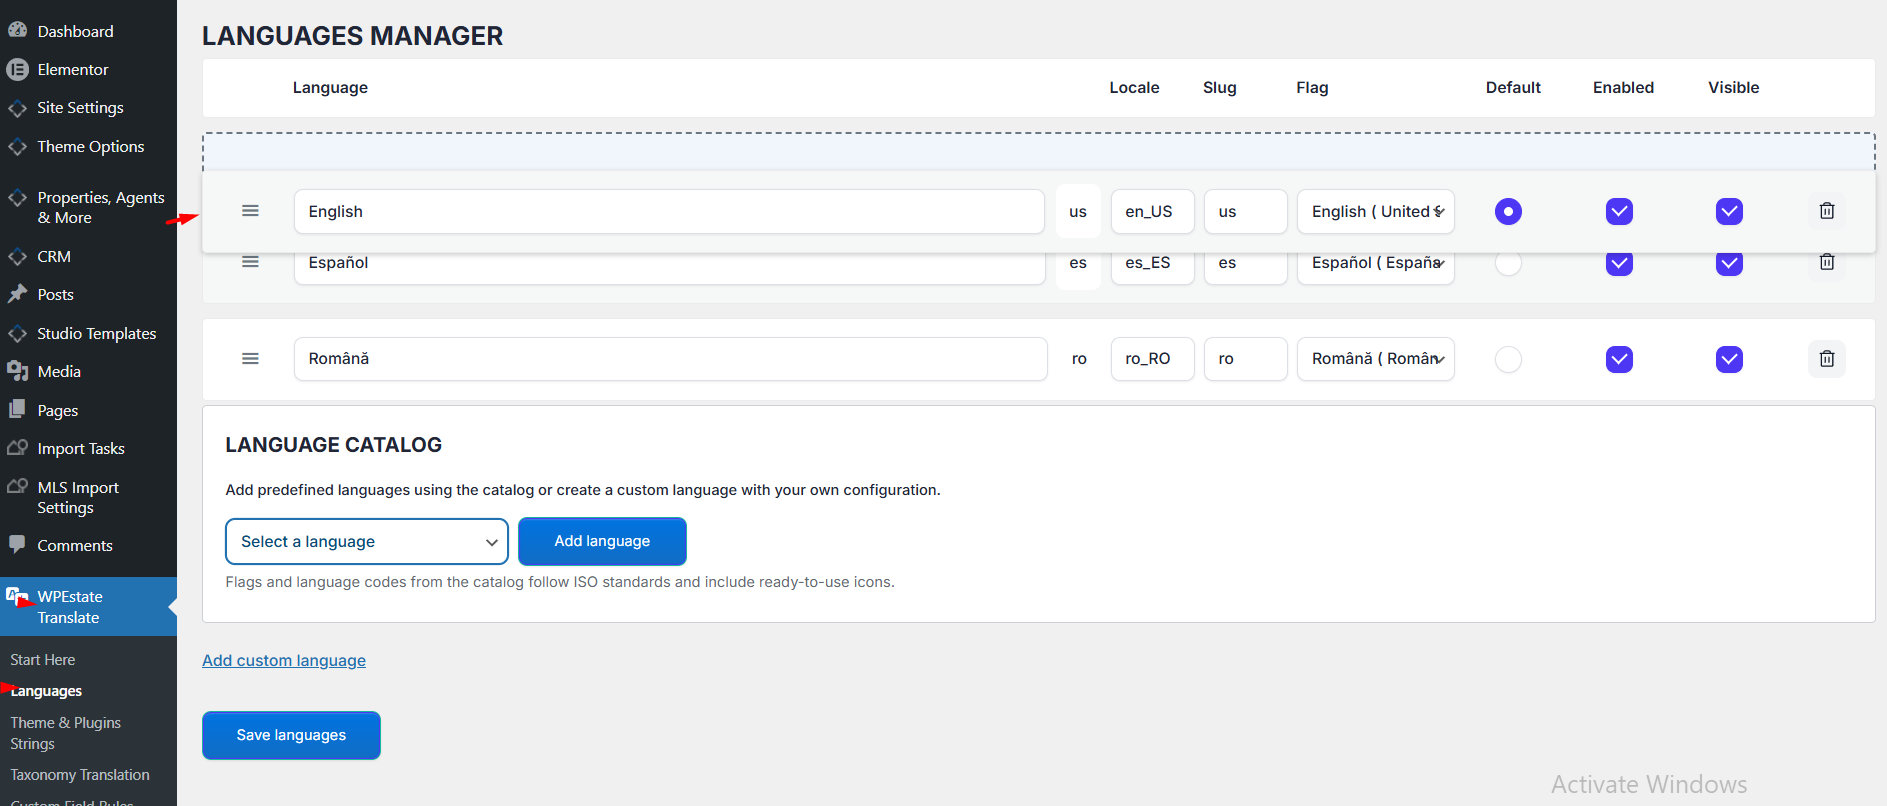
- Scroll to the Language catalog card below the languages grid.
- Pick a language from the Select a language dropdown. Languages already added are greyed out.
- Click Add language. A new row appears at the top of the grid with the catalog values filled in.
- Click Save languages to save the change.
Adding a Custom Language
If the language you need is not in the catalog, use the Add custom language link under the catalog card.
A blank row is added where you can fill in the fields manually.
Custom languages support non-Latin names and slugs, such as Cyrillic, Arabic, Chinese, Greek, Hebrew, Japanese, Korean, Thai, and more.
Fields in the Languages Grid
| Field | What it does |
|---|---|
| Drag handle | Use the menu icon on the left of each row and drag up or down to reorder. The order here is the order languages appear in the frontend switcher. |
| Language | Display name shown in switchers and admin lists. Free text, UTF-8 safe. |
| Language code | Short ISO-style code, for example en, fr, de. Used in URLs and stored on translated records. |
| Locale | WordPress locale string such as en_GB, fr_FR, or es_ES. This is also used for translation file loading and date formatting. |
| Slug | Auto-generated URL segment based on the code. Read-only in the form. |
| Flag | Dropdown of flag icons included with the plugin. Used next to the language name in the switcher. |
| Default | Radio button. Exactly one language can be the default. Content created without an explicit language is treated as being in the default language. |
| Enabled | Checkbox that controls whether the language is active. Disabled languages are not used for routing, queries, or switching. |
| Visible | Checkbox that controls whether the language is visible to frontend visitors. You can enable a language for admin work and hide it from the public switcher. |
| Remove | Trash icon that removes the row. The change only takes effect after you click Save languages. |
Setting the Default Language
The default language has two special behaviors:
- It is the language assumed for any post or term that has no explicit language assignment.
- Its URLs do not carry a language prefix. They use the clean site URL.
To change it, click the Default radio button on the target row and save.
Only one language can be set as default at one time.
Reordering Languages
Use the drag handle in the first column and move a row up or down.
The order you set here controls:
- The order of entries in the frontend Language Switcher widget.
- The order of entries in the admin bar Content Language dropdown.
- The order used when resolving browser language preference during language detection.
Enabled vs Visible — What is the Difference
These two checkboxes look similar, but they do different things:
- Enabled — the language is active in the plugin. If disabled, the system does not use the language for routing, filtering, or the switcher.
- Visible — the language is active and shown to frontend visitors. Turn this off if you are preparing translations that are not ready for launch. Editors can still work in that language from the admin, but visitors cannot switch to it.
Generated Translation Files and the wpr Folder
When you use WPEstate Translate and generate translation files, the plugin can create a folder named:
languages/wpr/
This folder is normal.
The wpr folder is used by WPEstate Translate to store generated translation files for the languages added in the plugin.
For example, if you add Spanish and French and generate translation files, you may see files for those languages inside:
wp-content/themes/wpresidence-child/languages/wpr/
or inside another active theme language location, depending on your setup.
The wpr folder is not an error and does not mean the translation is broken.
It is created when WPEstate Translate generates translation files based on the languages configured in the plugin.
Why You May See More Than One File for the Same Language
You may see more than one file for the same language because WPResidence uses more than one source for text.
A multilingual site can include strings from:
- The WPResidence theme
- The WPResidence child theme
- WPResidence Core Functionality plugin
- WPResidence Elementor Widgets plugin
- WPEstate Translate generated files
- Elementor content
- Menus and widgets
- Theme Options custom text fields
Because of this, one language can have several translation files.
For WPResidence, file names can include the theme or plugin text domain and the locale, for example:
wpresidence-es_ES.po wpresidence-es_ES.mo wpresidence-core-es_ES.po wpresidence-core-es_ES.mo
For WPRentals, the same logic applies, but the file names use the WPRentals text domain, for example:
wprentals-es_ES.po wprentals-es_ES.mo wprentals-core-es_ES.po wprentals-core-es_ES.mo
If you see several files for the same language, this usually means they are connected to different sources, such as the theme, the core plugin, or generated WPEstate Translate files.
Theme, Plugin, and WPEstate Translate Files
It is important to understand the difference between theme translation files, plugin translation files, and generated WPEstate Translate files.
Theme translation files translate strings that come from the WPResidence theme.
Child theme translation files translate strings added by the child theme.
Plugin translation files translate strings that come from plugins, such as WPResidence Core Functionality or WPResidence Elementor Widgets.
Plugin strings cannot be translated only from the child theme language file. If a string comes from a plugin, it must exist in the plugin translation file for that plugin text domain.
WPEstate Translate generated files are created by the WPEstate Translate plugin when you generate translation files for the languages added in the plugin.
These generated files are stored in the wpr folder and are used by WPEstate Translate when that translation source is active.
Removing Unused Generated Files
If you have extra generated translation files that you do not use, you can remove them.
Before deleting anything, make a full backup of the website and translation files.
If your correct working files are already identified, keep those files and remove only the extra generated files that are not needed.
You can remove unused generated translation files from Loco Translate if they are listed there, or by file manager / FTP if you are sure which files are not used.
After removing unused files:
- Clear theme cache.
- Clear plugin cache.
- Clear server/CDN cache, if used.
- Clear browser cache.
- Test the translated labels again.
If you are not sure which file is active, do not delete it. First rename it or make a backup copy, then test.
Removing a Language
Clicking the trash icon removes the language row from the grid.
The change is only saved after you click Save languages.
Removing a language does not delete translated posts and pages created in that language. They remain in the database and can be reactivated later by re-adding the same language code.
If translation files were generated for that language, those files may still remain in the language folders until you remove them manually.
Non-Latin Languages
Every field on this screen preserves UTF-8.
You can enter language names in Cyrillic, Arabic, Greek, Hebrew, Chinese, Japanese, Korean, Thai, and more.
Slugs are derived from the code, but names and flags are rendered as entered.
Typical Setups
- Bilingual site: add both languages from the catalog, set the main site language as default, and keep both Enabled and Visible.
- Staged rollout: add a new language but leave Visible unchecked until translations are complete. Editors can still prepare content in that language.
- Regional variants: add variants with distinct locales, for example
en_GBanden_US, to support different spelling, formatting, and date styles.
What Happens After You Save
After you save the language settings:
- The admin bar Content Language switcher updates.
- The frontend Language Switcher widget re-reads its list.
- Permalinks for non-default languages start with the language slug.
- If you added the first extra language, translation UI appears in the post editor and post list table.
- If you generate translation files, the plugin may create or update files in the
languages/wpr/folder.
For the full conceptual overview of how multilingual data works through the plugin, see our guide to building a multi-language real estate website.
What To Read Next
- Translating Posts & Pages — create your first translation variant.
- Language Switcher Widget — let visitors pick their language on the frontend.
- Admin Bar Language Switcher & Editor Header Selector — the two in-admin switchers.